Open HardwareAssembly Instructions
Guides for installation and assembly of the LulzBot line of products made by FAME 3D LLC.
Guides for installation and assembly of the LulzBot line of products made by FAME 3D LLC.
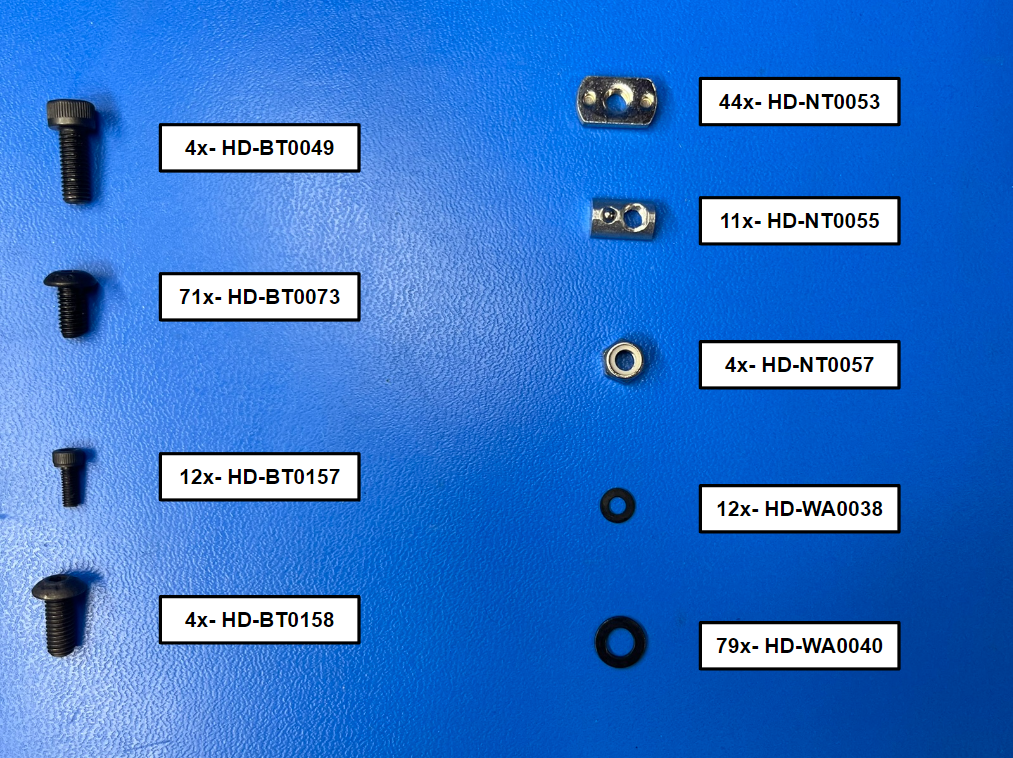
4x- [HD-BT0049] M5x14 SHCS, Black-Oxide
71x- [HD-BT0073] M5x10 BHCS, Black-Oxide
12x- [HD-BT0157] M3x8 SHCS, Black-Oxide
4x- [HD-BT0158] M5x12 BHCS, Black-Oxide
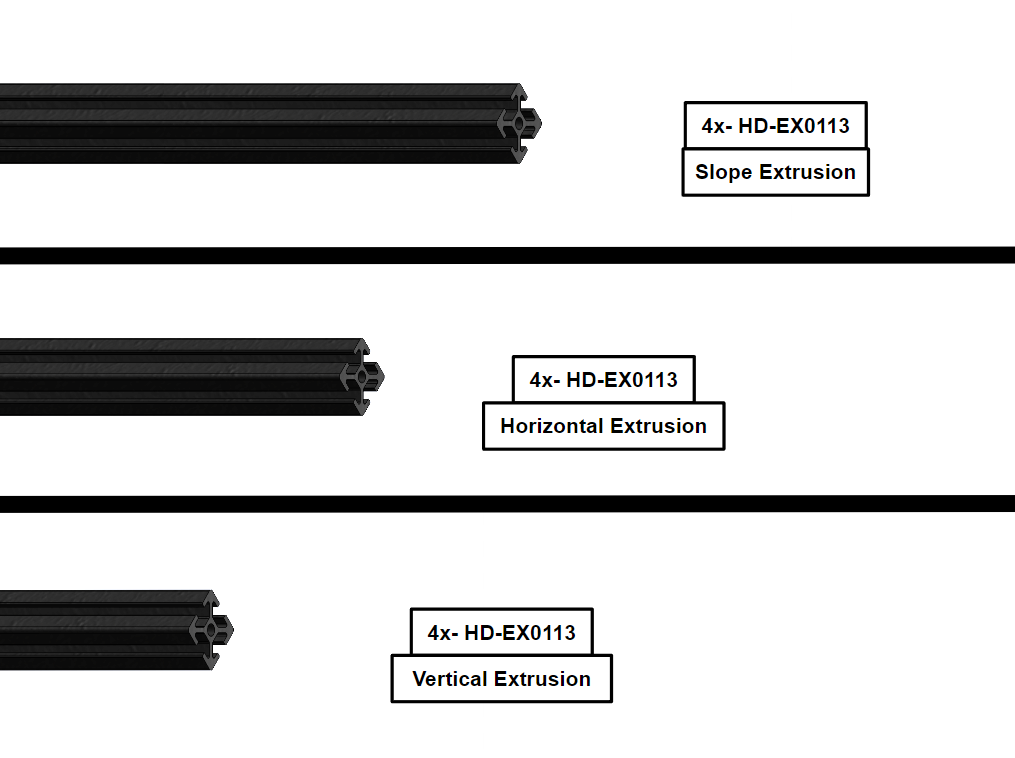
4x- [HD-EX0113] 598mm Slope Extrusion
4x- [HD-EX0114] 522mm Horizontal Extrusion
4x- [HD-EX0115] 396mm Vertical Extrusion
44x- [HD-NT0053] M5 T-Slot Nut
11x- [HD-NT0055] M5 T-Slot Roll In Nut
4x- [HD-NT0057] M5 Locknut
12x- [HD-WA0038] M3 Washer
79x- [HD-WA0040] M5 Washer
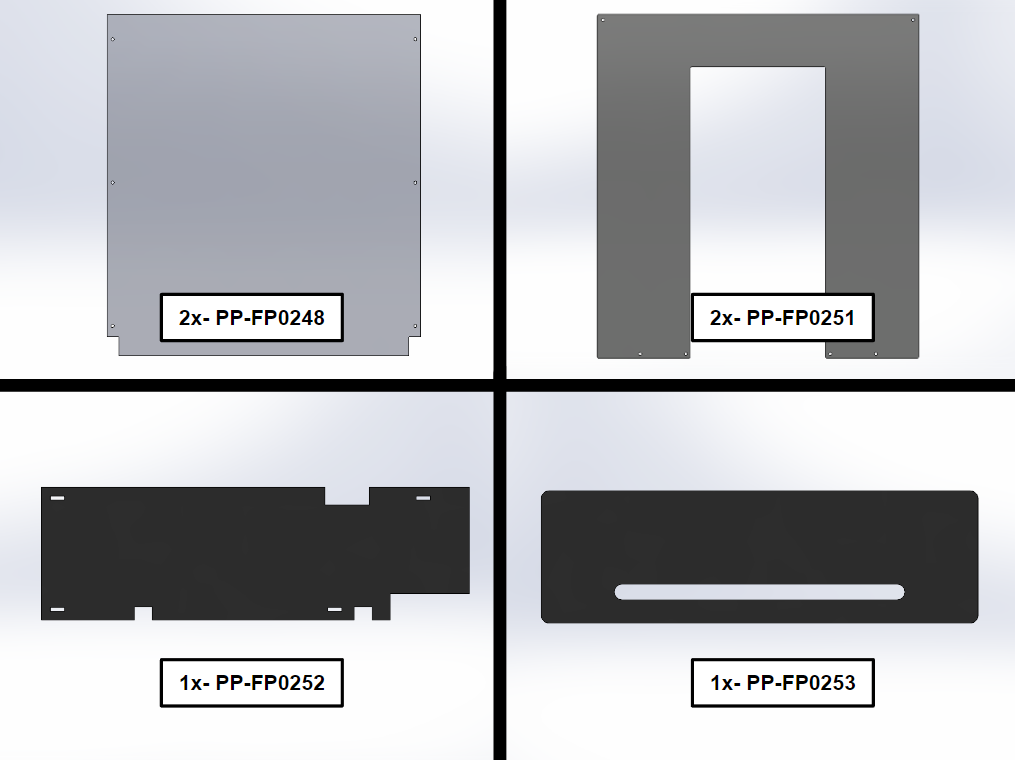
2x- [PP-FP0248] Top_Slope_LB
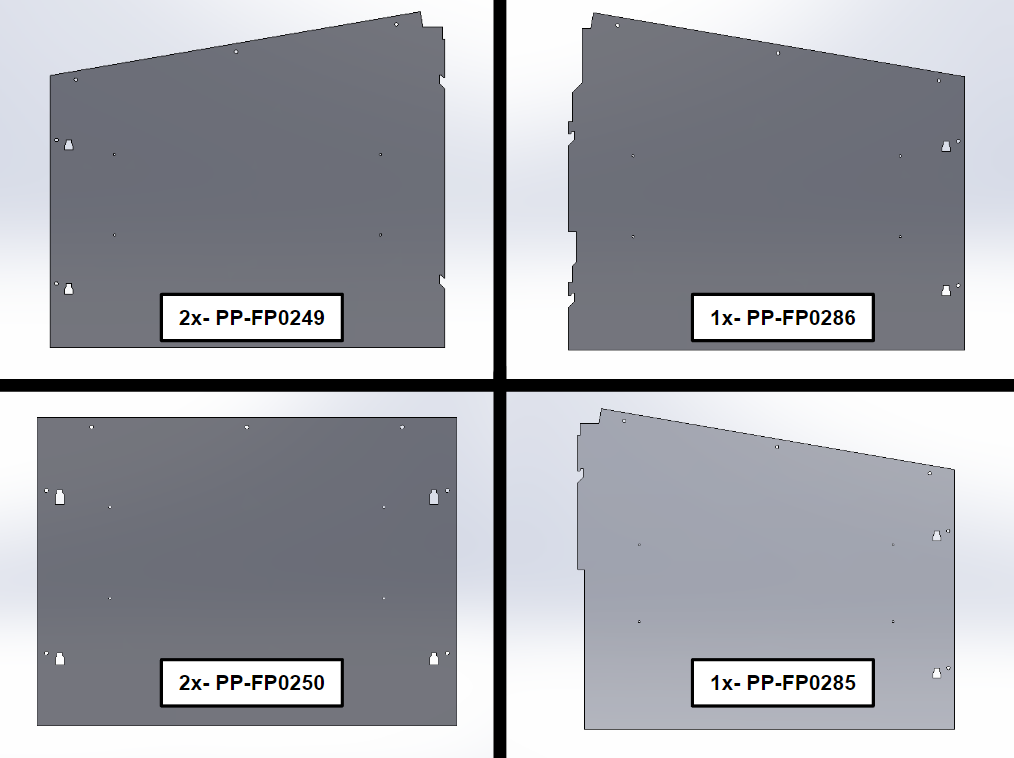
2x- [PP-FP0249] Side_Panel_LB
1x- [PP-FP0285] BL_Side_Panel_LB
1x- [PP-FP0286] BR_Side_Panel_LB
2x- [PP-FP0250] Door_Panel_LB
2x- [PP-FP0251] Bottom_Panel_LB
1x- [PP-FP0252] Filament_Side_Panel
1x- [PP-FP0253] Top_Cover
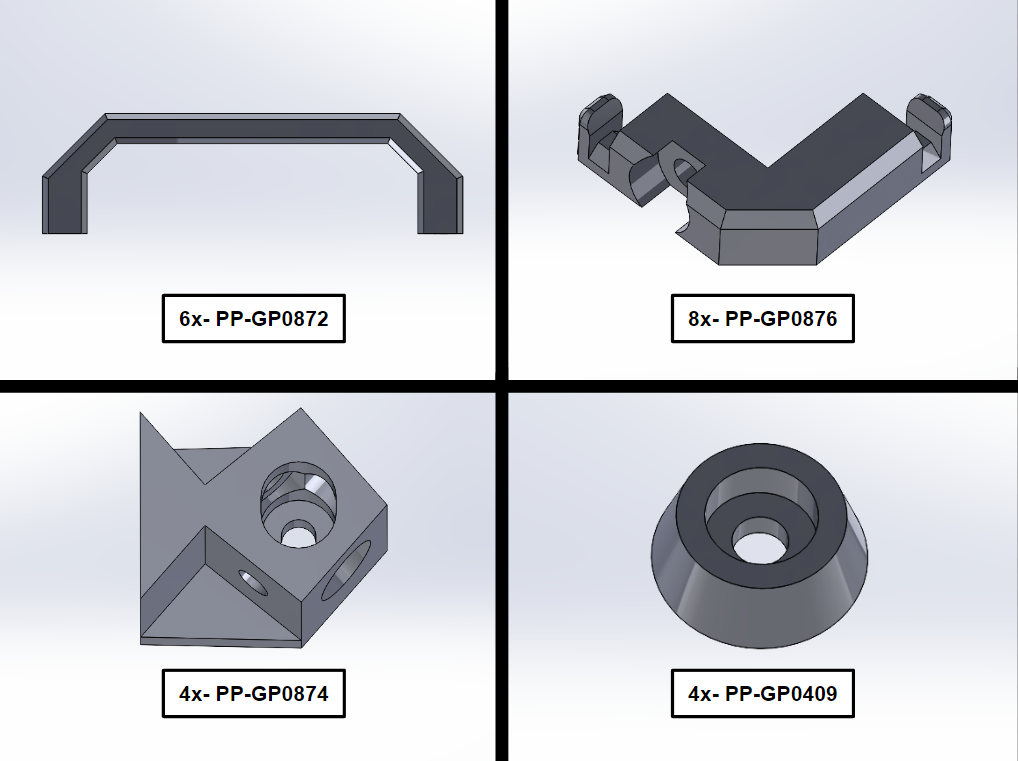
4x- [PP-GP0409] Frame Foot
6x- [PP-GP0872] Handle
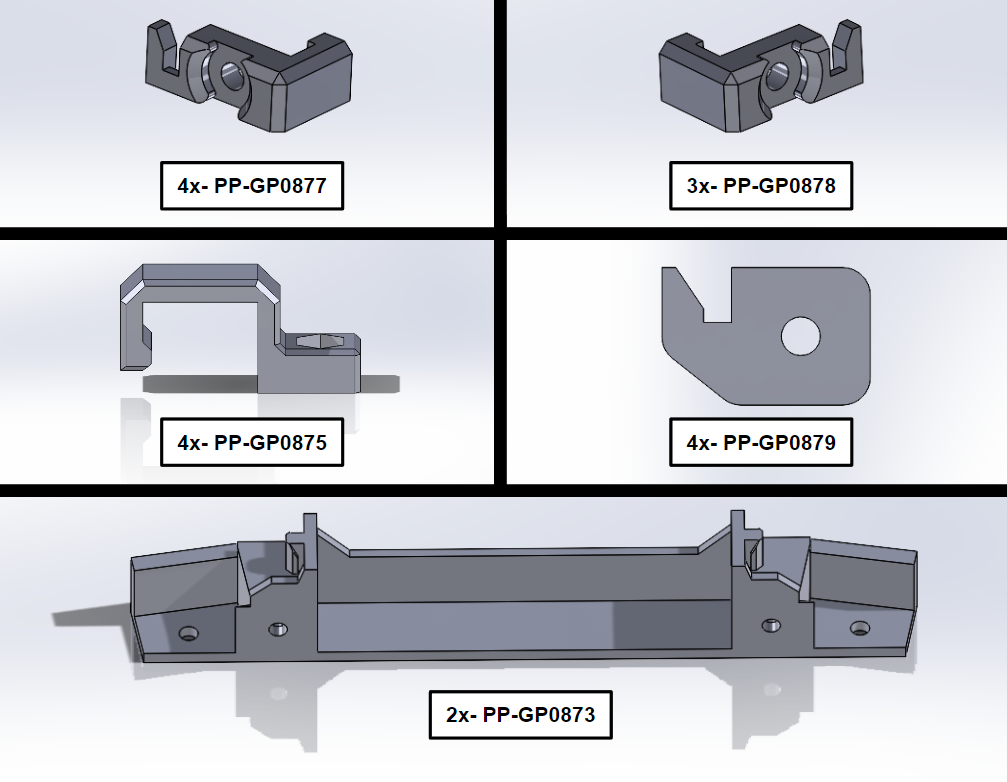
2x- [PP-GP0873] Center_Brace
4x- [PP-GP0874] Extrusion_Corner
4x- [PP-GP0875] Bottom_Clamp
8x- [PP-GP0876] Panel_Clip
4x- [PP-GP0877] LH_Panel_Clip
3x- [PP-GP0878] RH_Panel_Clip
4x- [PP-GP0879] Side_Panel_Clip
To install the frame brackets use the following bagged printed parts and hardware:
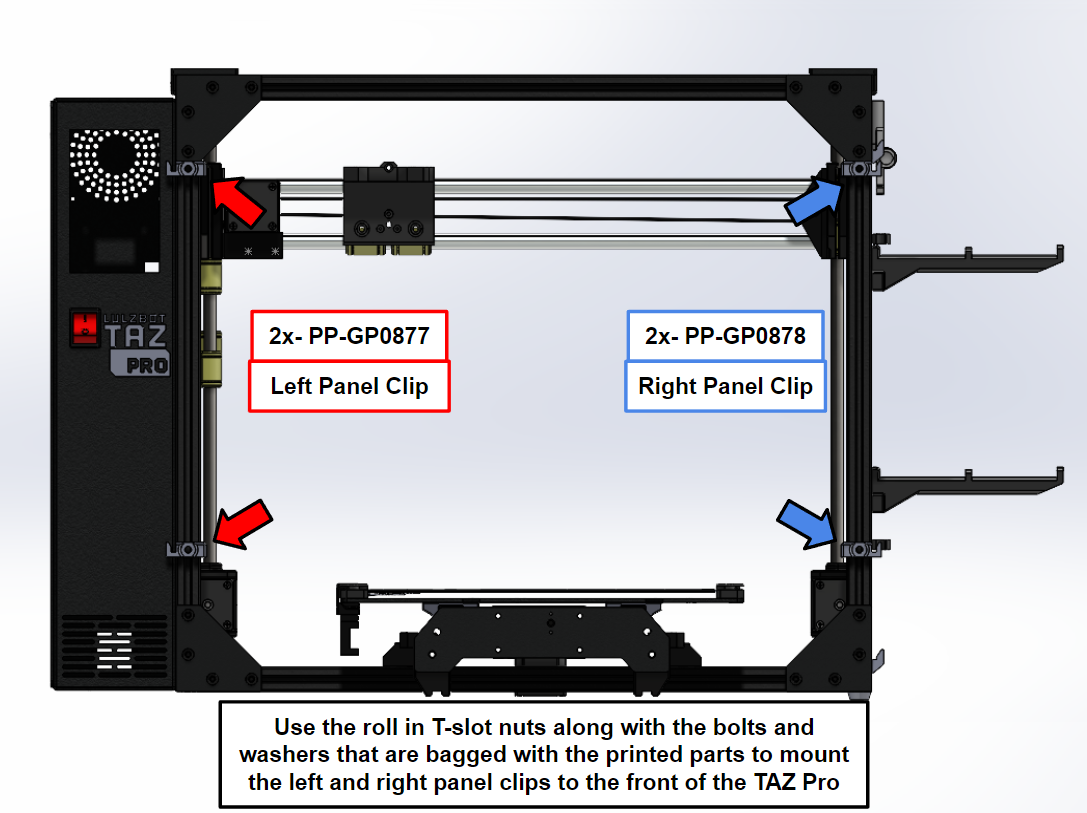
Leave the LH Panel Clips, RH Panel Clips, and Side Panel Clips loose, once the side panels are installed they can be tightened.
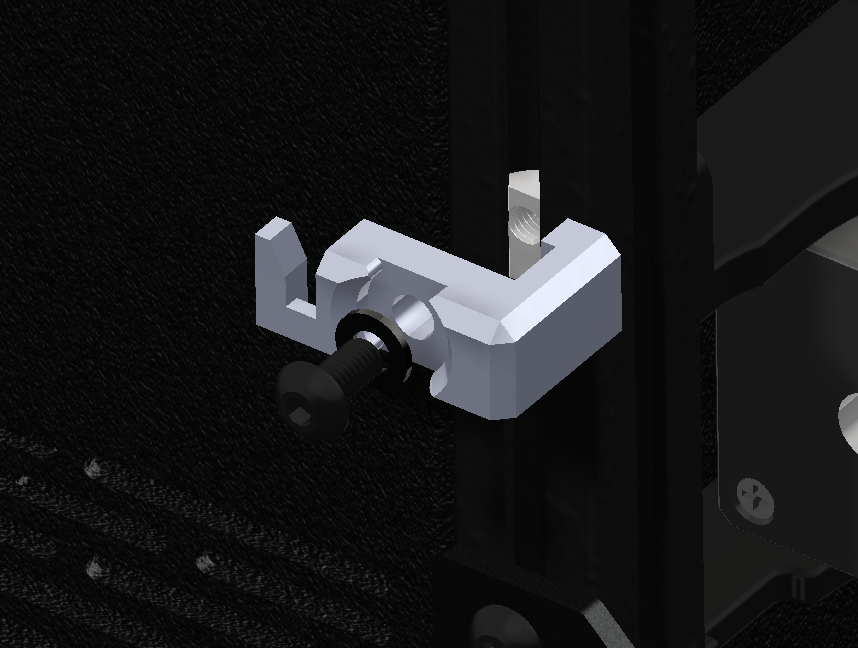
First mount 2x [PP-GP0877] LH Panel Clips to the front side of the front left extrusion and 2x [PP-GP0878] RH Panel Clips to the front side of the front right extrusion. Use the M5 T-slot roll in nuts along with the M5x10mm BHCS and M5 washers. The hardware should be bagged with the printed parts.
Now repeat the process for the backside of the printer frame. The back left extrusion only needs 1x RH panel clip since the wires are on the bottom half.
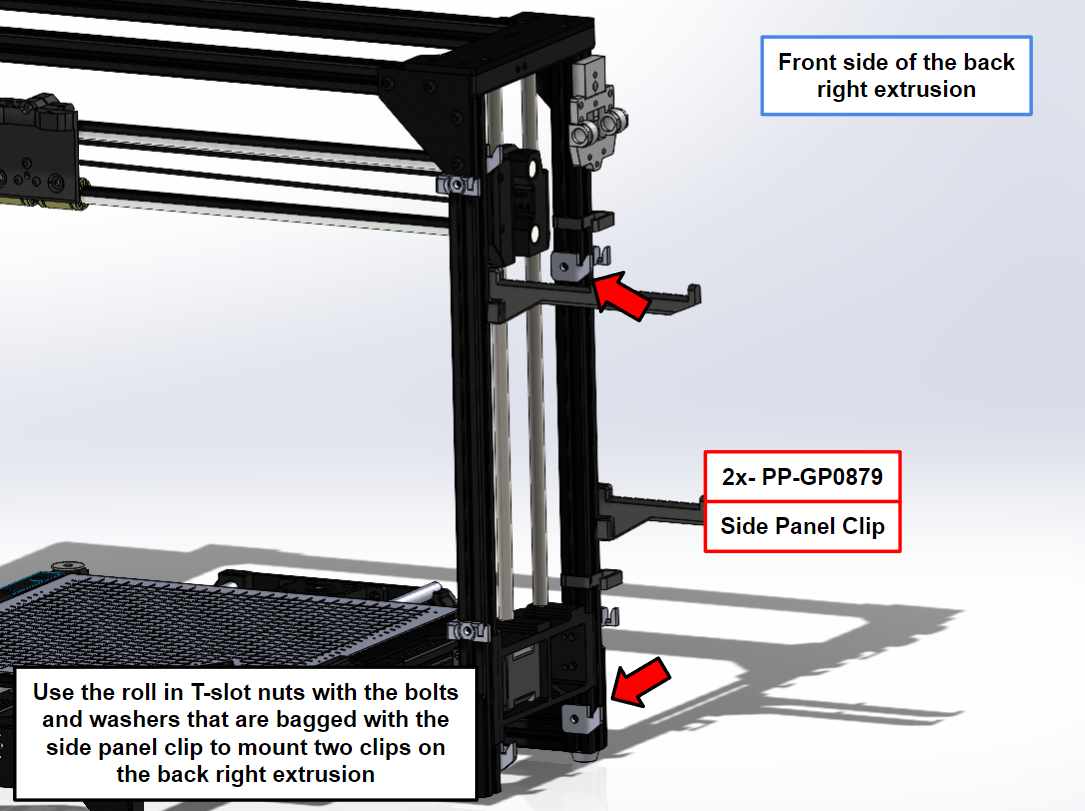
Using the same process mount the 4x [PP-GP0879] Side Panel Clips. 2x side panel clips will be mounted on the front side of the back right extrusion and the other 2x side panel clips will be mounted on the backside of the front right extrusion.
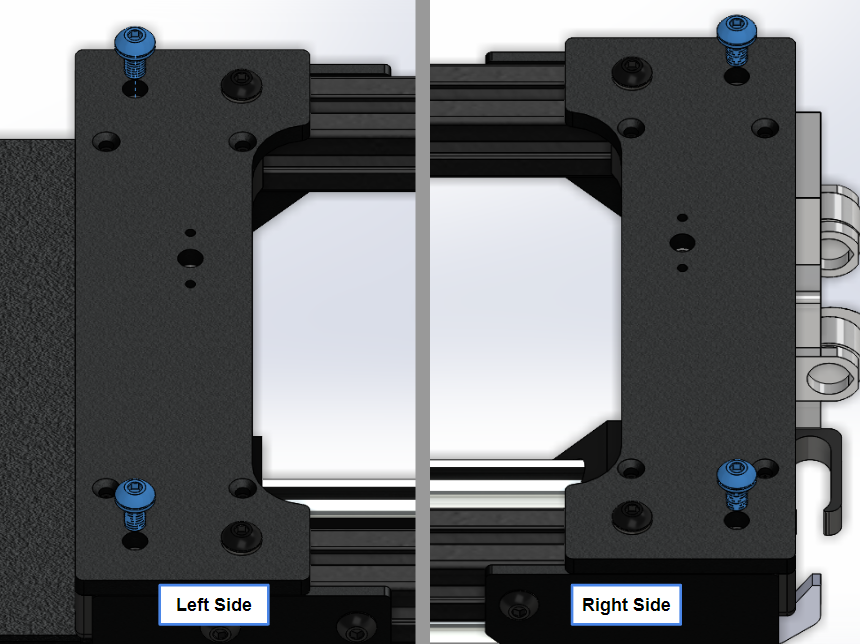
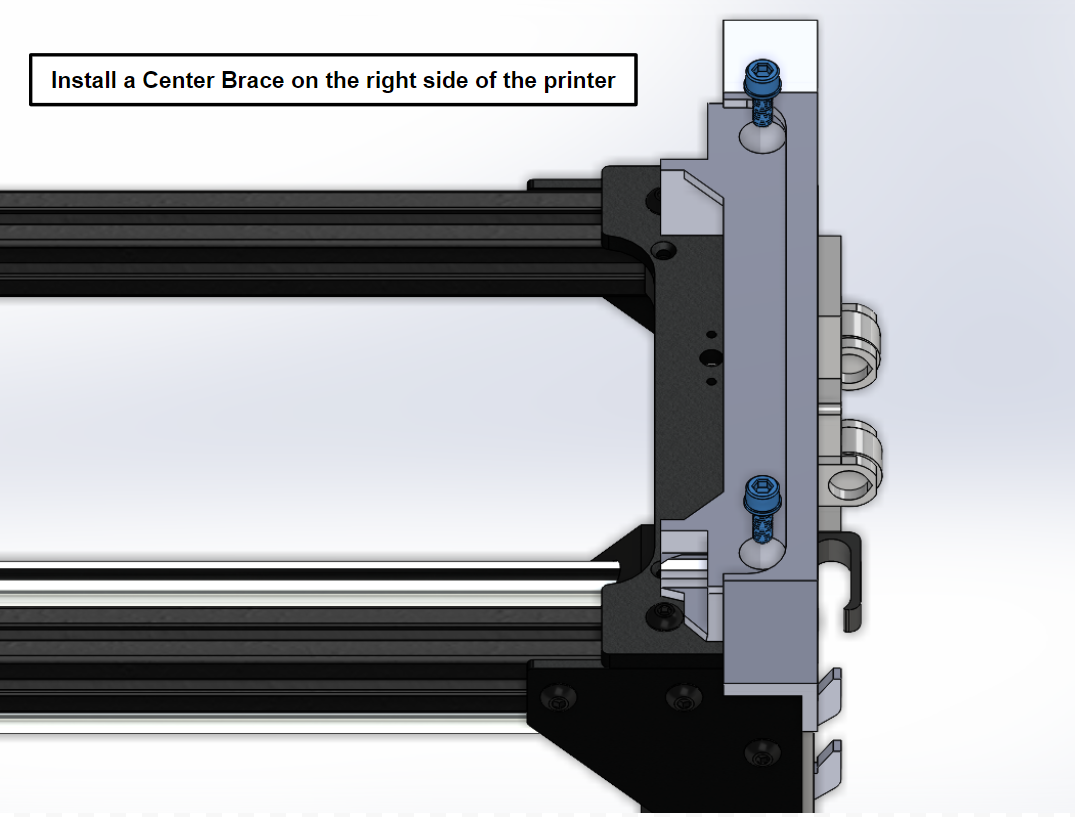
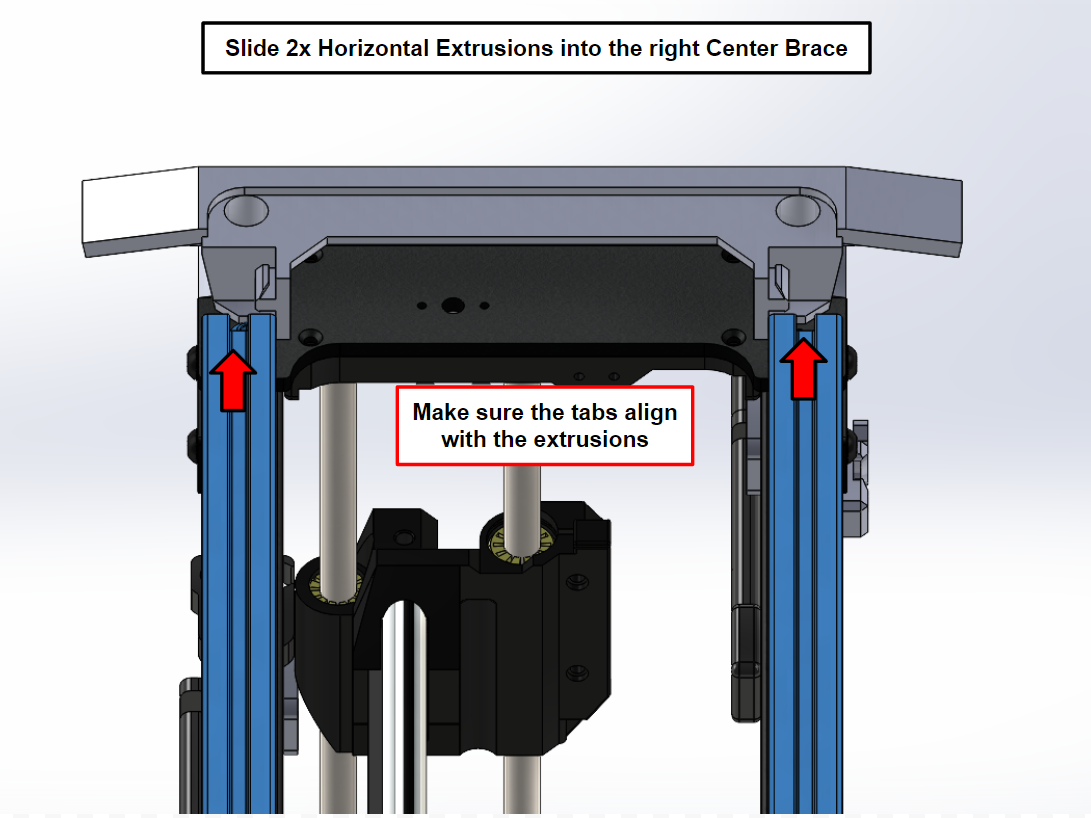
Then remove the four bolts securing the top side of the four vertical frame extrusions. Once the bolts are removed, Secure 1x [PP-GP0873] Center Brace on the right side of the printer. Note: The flat side will be on the outside of the printer frame. Use 2x M5x14mm SHCS with M5 washers to secure the center brace.
Now slide 2x Horizontal (Medium) Extrusions [HD-EX0114] into the right Center Brace. **Make sure the extrusions are aligned with the extrusion tabs on the Center Brace.
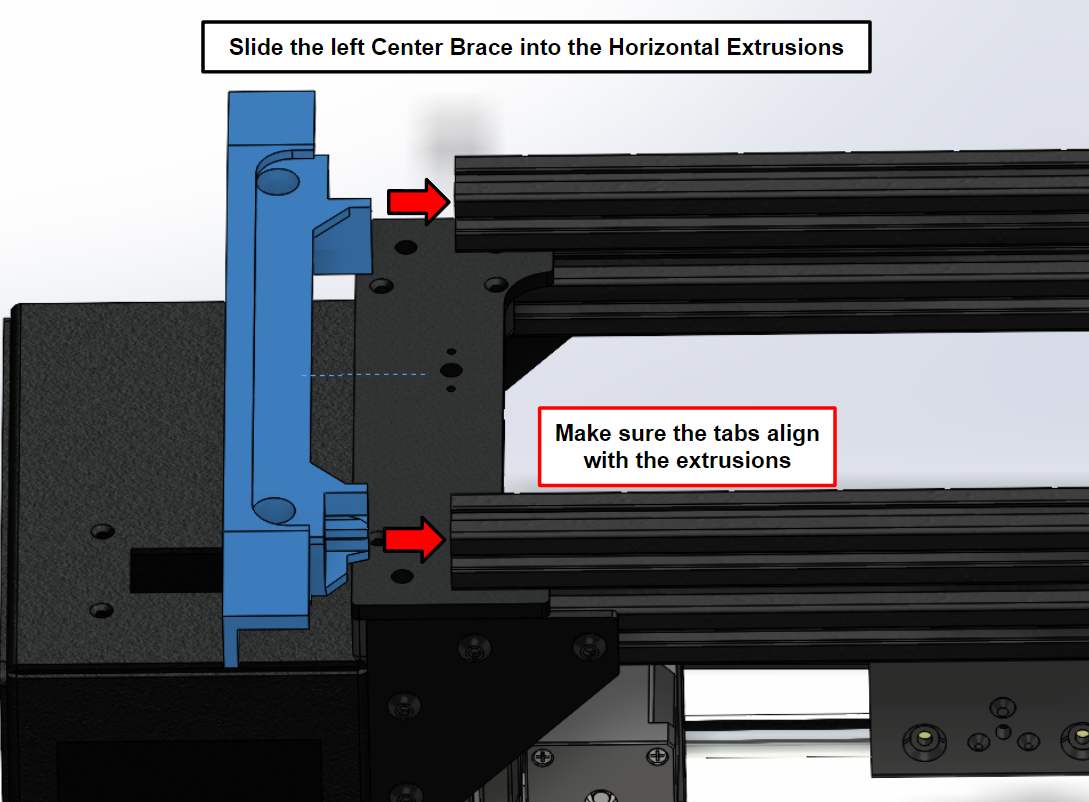
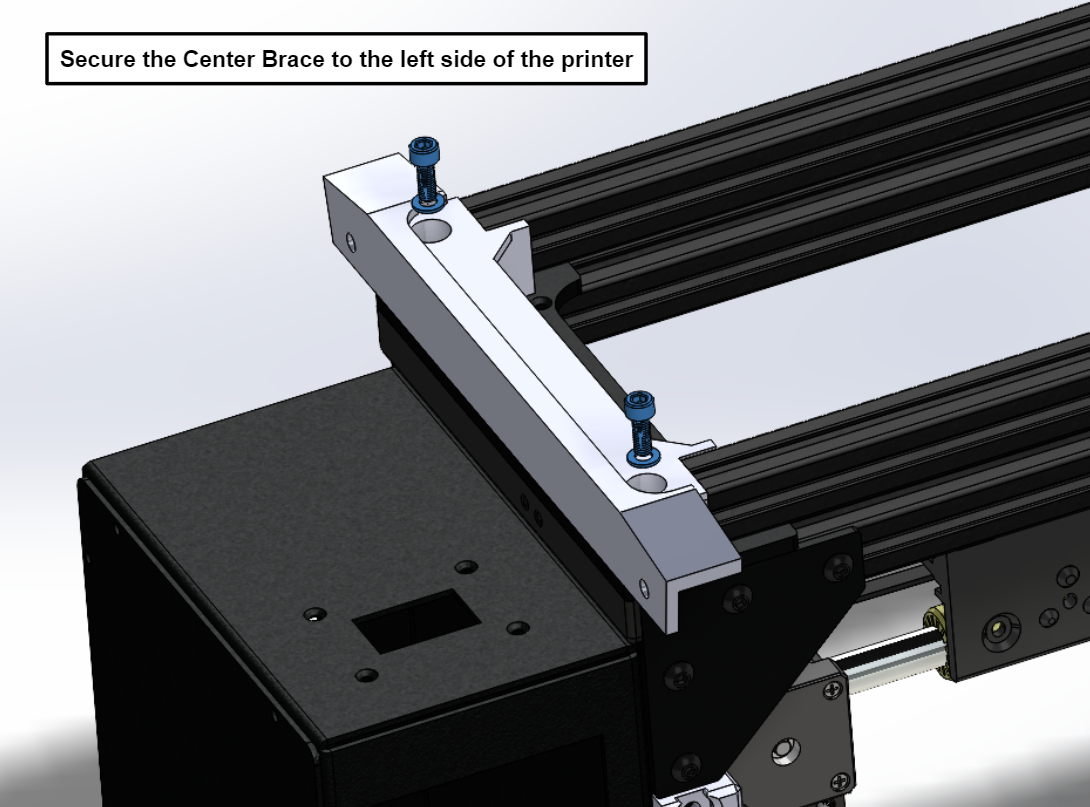
Then slide the other Center Brace into the two Extrusions and secure it using 2x M5x14mm SHCS with M5 washers.


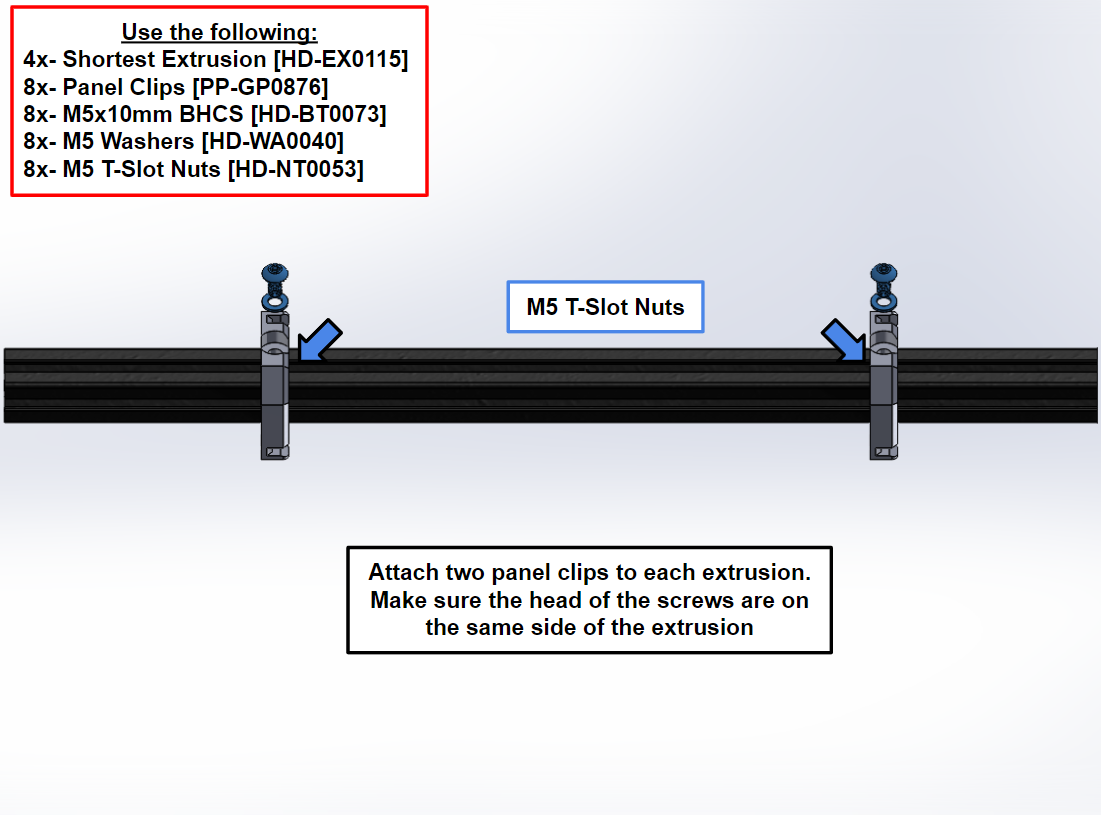
Gather 4x Vertical (Short) Extrusions [HD-EX0115], 8x Panel Clips [PP-GP0876], 8x M5x10mm BHCS [HD-BT0073], 8x M5 washers [HD-WA0040], and 8x M5 T-Slot nuts [HD-NT0053].
Then install 2x Panel Clips to each extrusion using 2x M5x10mm BHCS, M5 Washers, and M5 T-Slot nuts. Make sure the screw heads are on the same side of the extrusions.
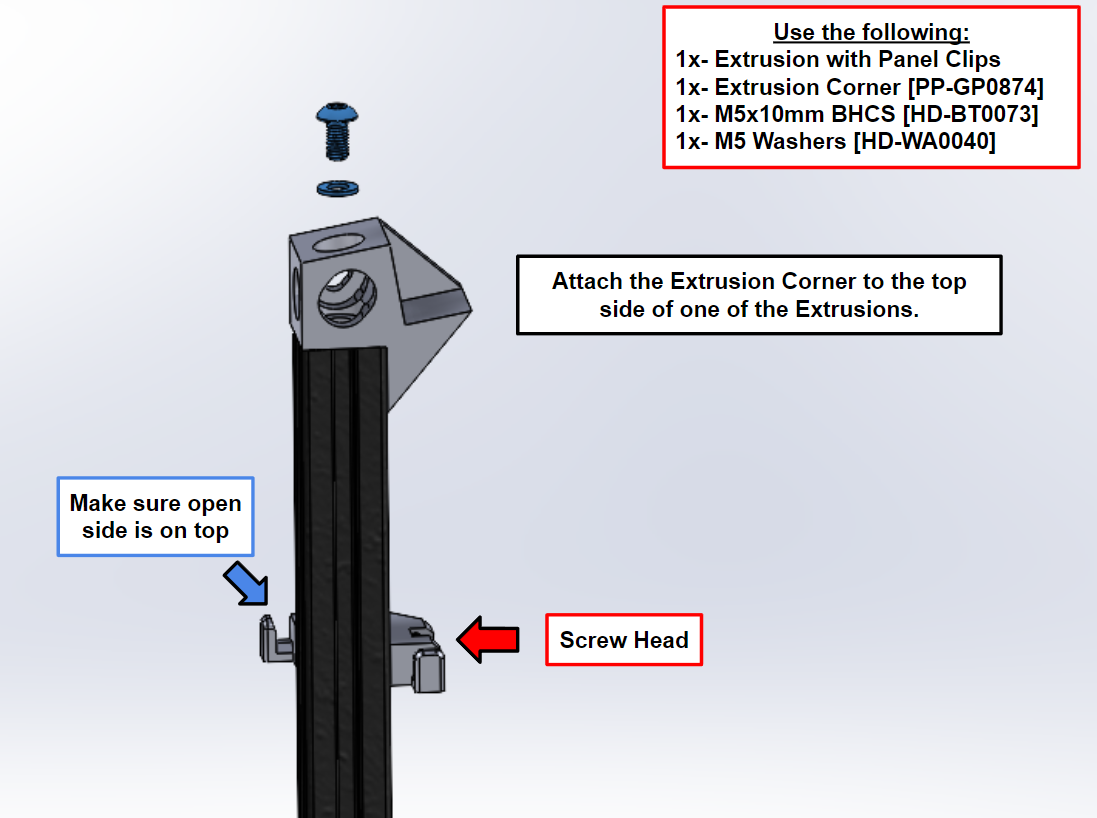
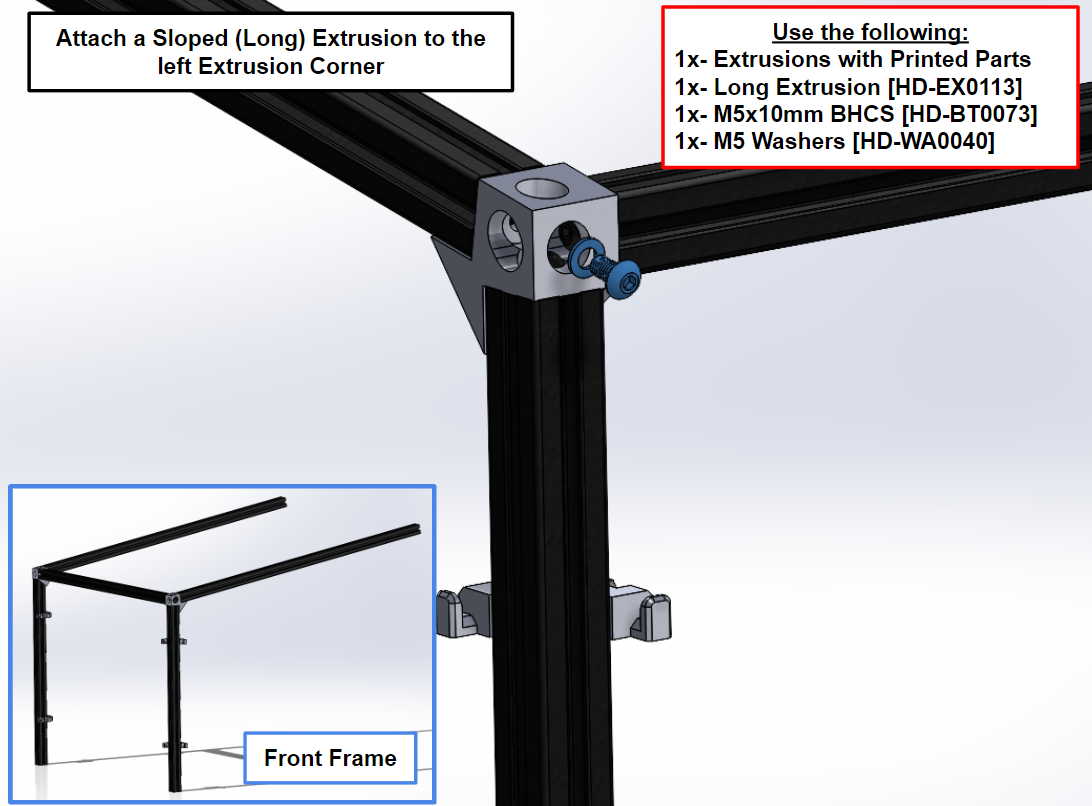
Now Gather 2x Extrusion Corners [PP-GP0874] along with 6x M5x10mm BHCS [HD-BT0073] and 6x M5 washers [HD-WA0040]. This will be the rest of the hardware and printed parts needed for the front frame.
Install 1x Extrusion Corner to the top side of one of the Vertical Extrusions making sure the panel clip's open side is facing up and the screw head is on the same side as the angled side of the Extrusion Corner.
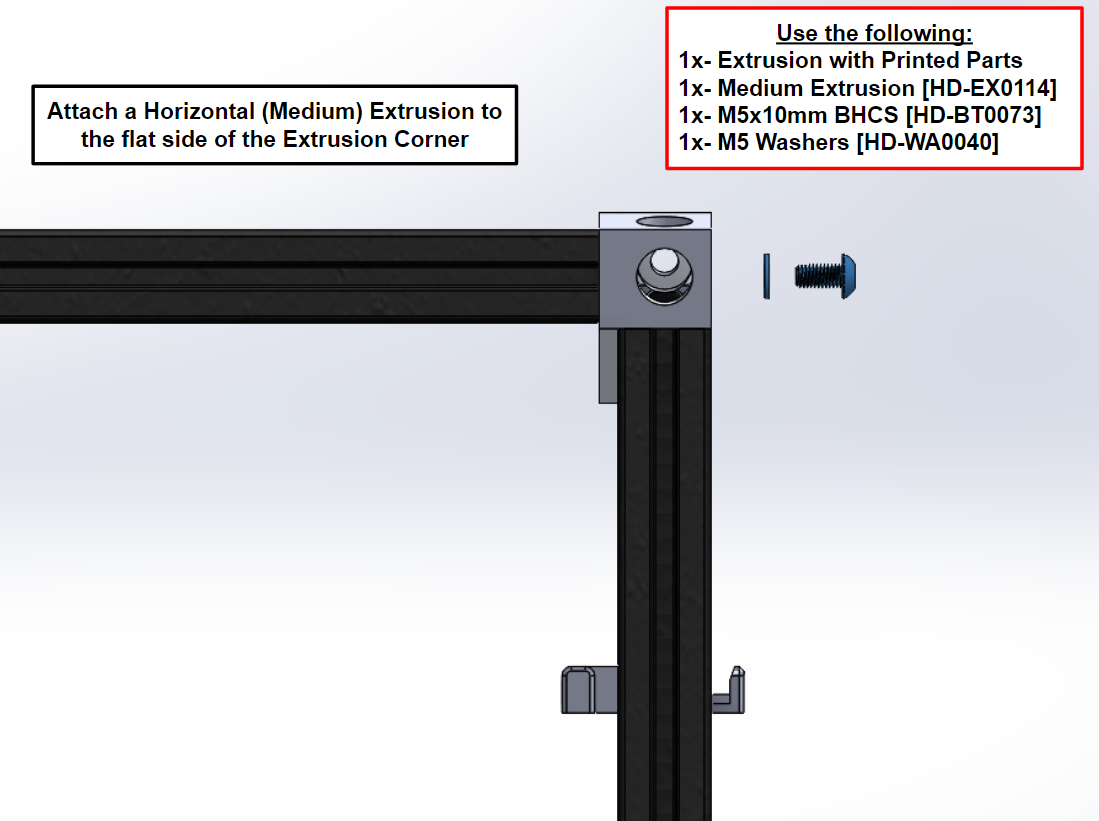
Then on the flat side of the Extrusion Corner install 1x Horizontal (Medium) Extrusion [HD-EX0114].
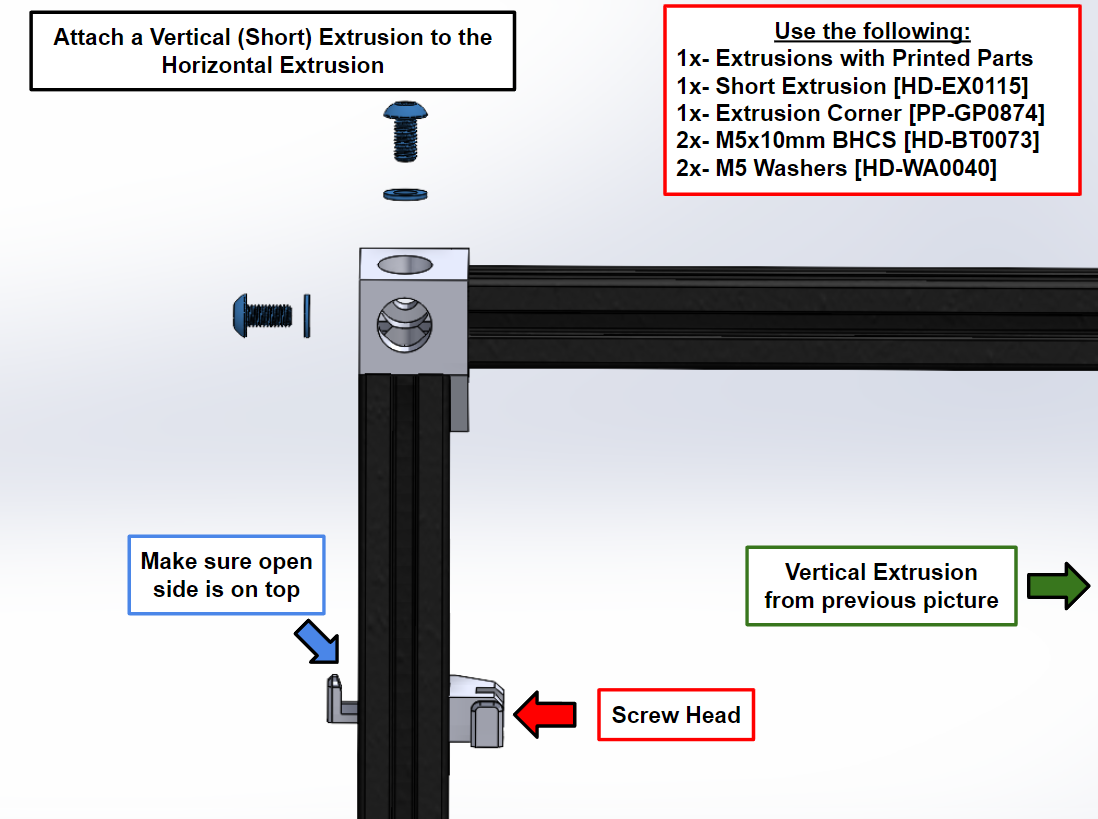
On the left side of the Horizontal Extrusion Mirror the right side using a Extrusion Corner and a Vertical Extrusion with printed parts.
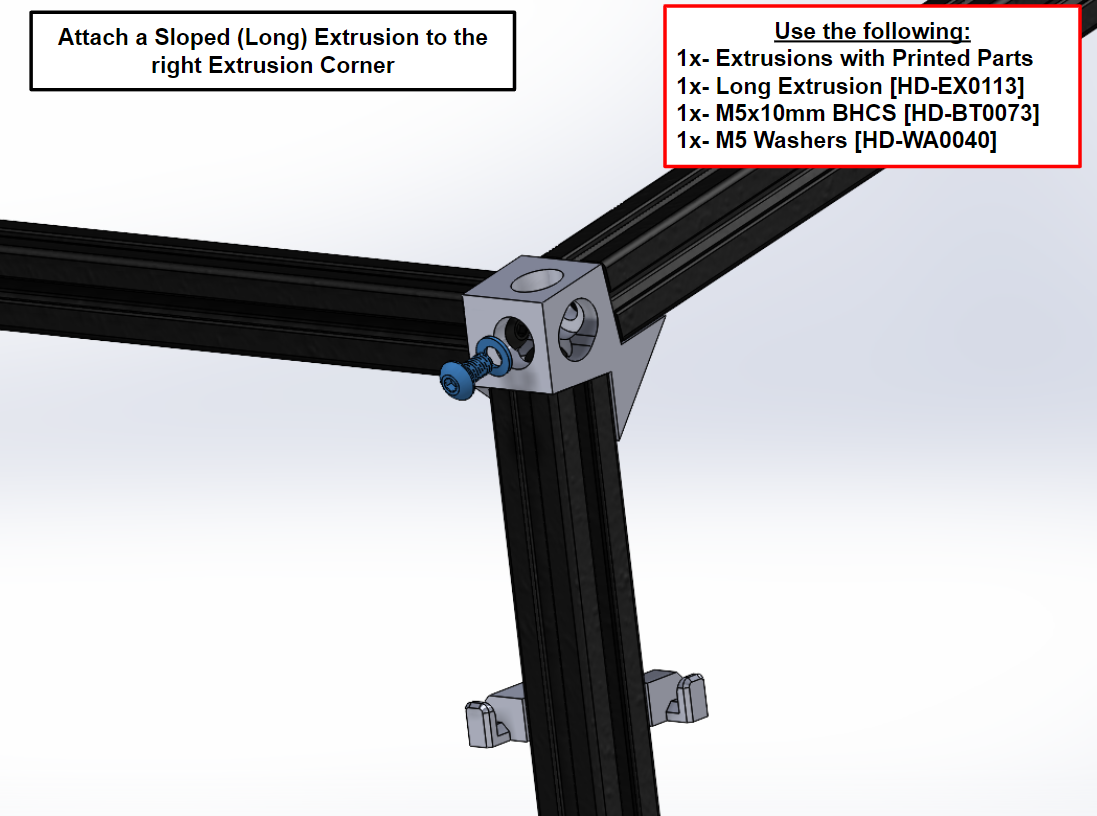
Then install 2x Sloped (Long) Extrusion to both Extrusion Corners.
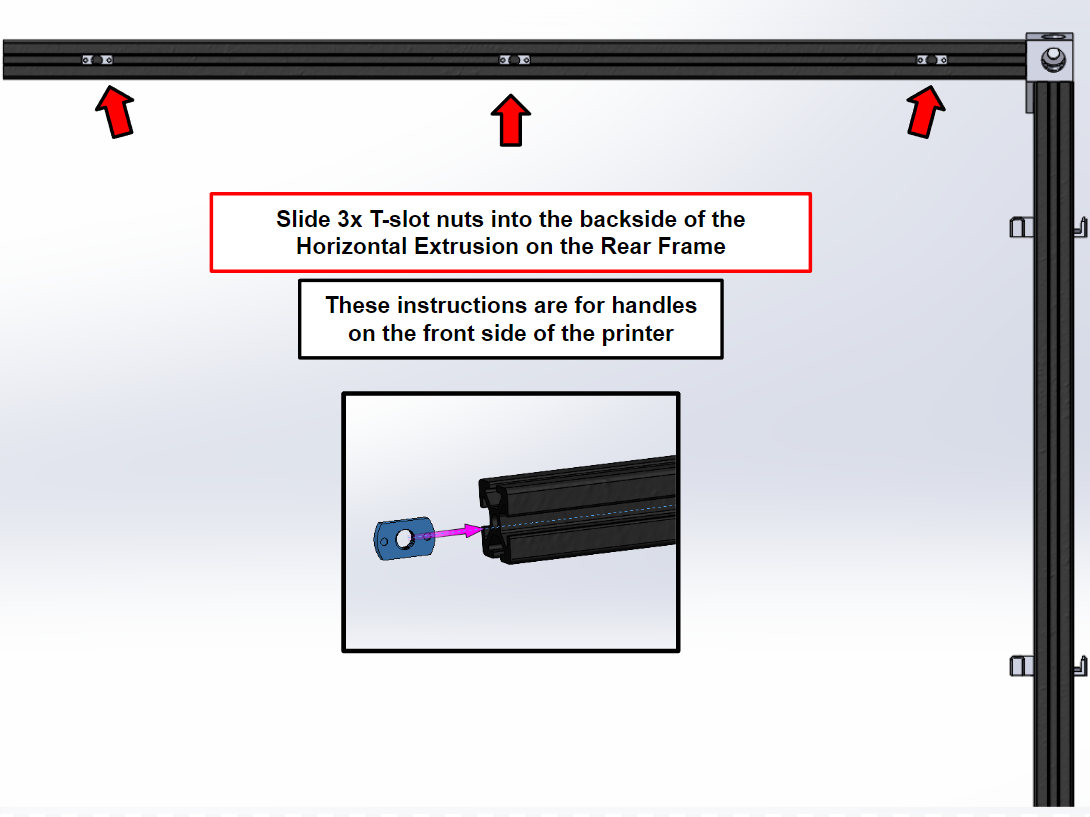
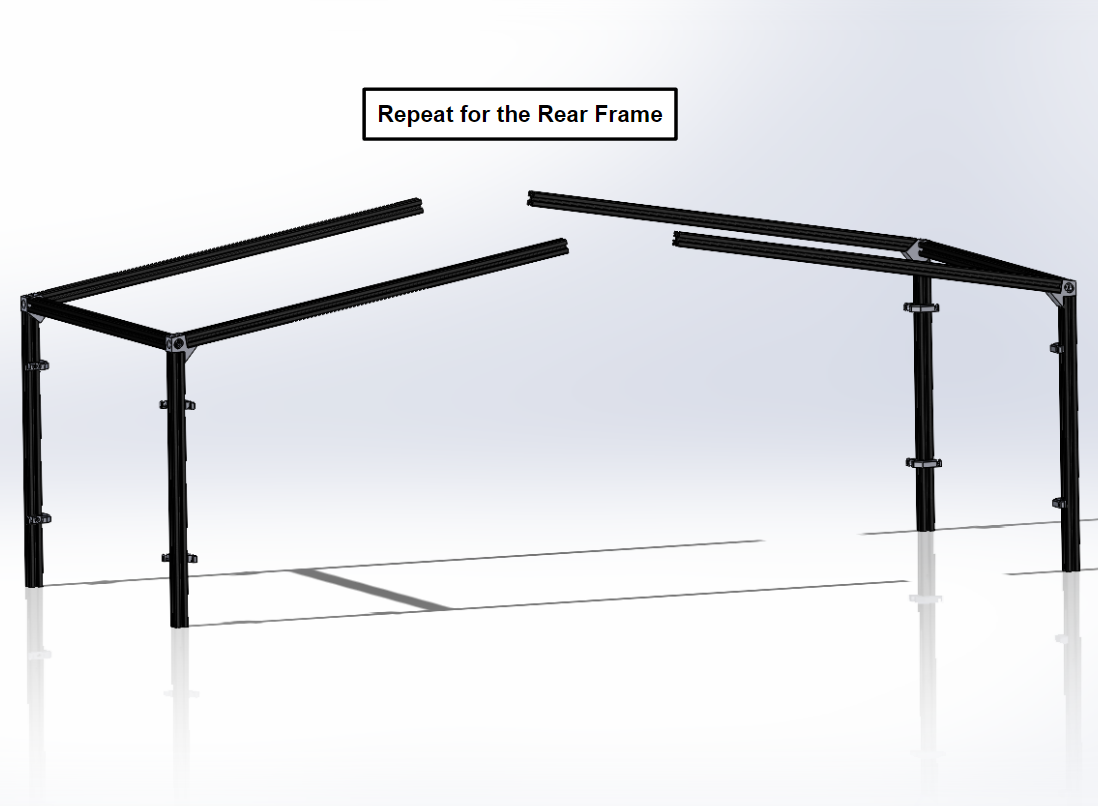
Now Repeat steps for the Rear Extrusion Frame. Before installing the second Vertical Extrusion follow [reference#1]!
[reference#1]: Before installing the second Vertical Extrusion, slide 3x M5 T-Slot Nuts into the backside of the Horizontal Extrusion.
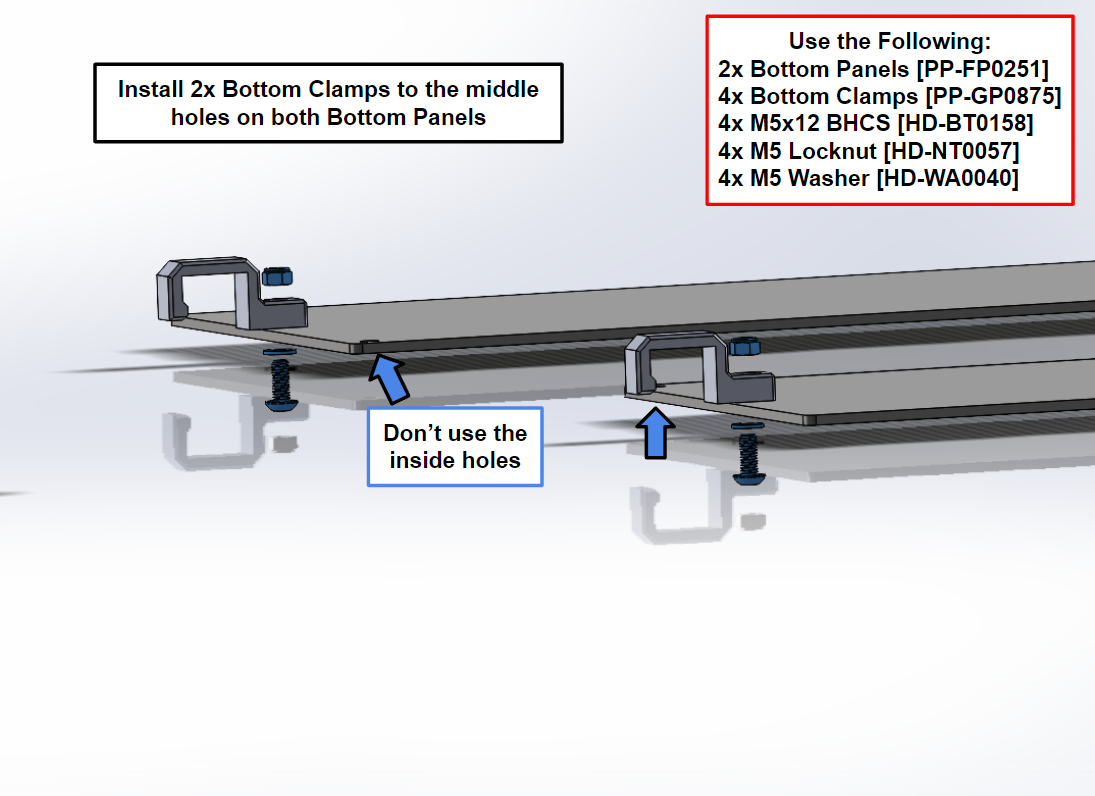
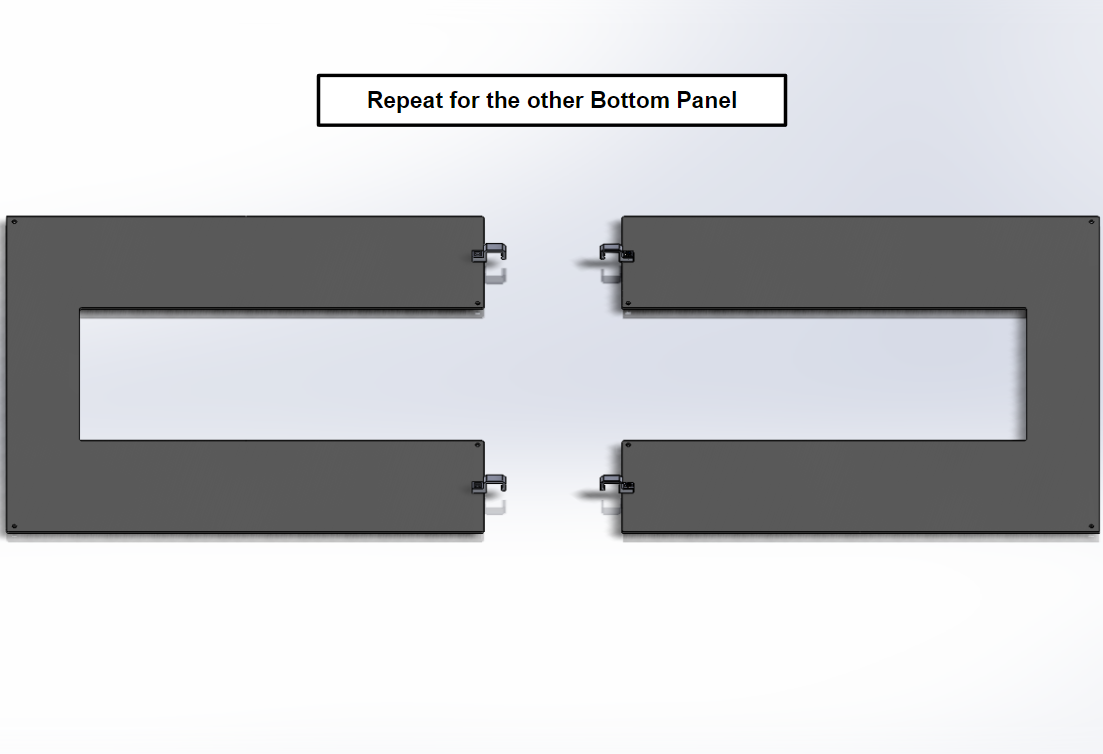
Install 2x Bottom Clamps [PP-GP0875] to a Bottom Panel [PP-FP0251], using 2x M5x12 BHCS [HD-BT0158], 2x M5 Washer [HD-WA0040], and 2x M5 Locknut [HD-NT0057].
Then repeat for the second Bottom Panel.
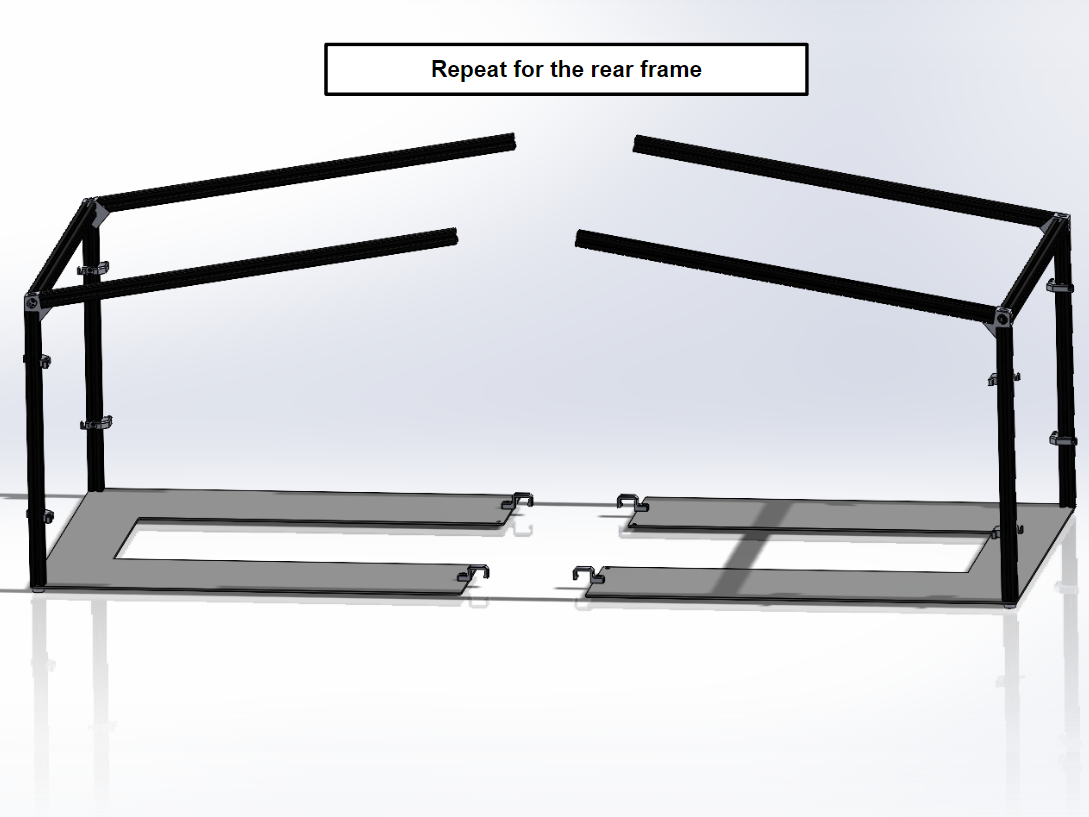
Now install 2x Frame Feet [PP-GP0409] and a Bottom Panel to the two Vertical Extrusions on the Front Frame. Use 2x M5x10 BHCS and 2x M5 Washers, make sure open side of the Bottom Clamps is facing downward.
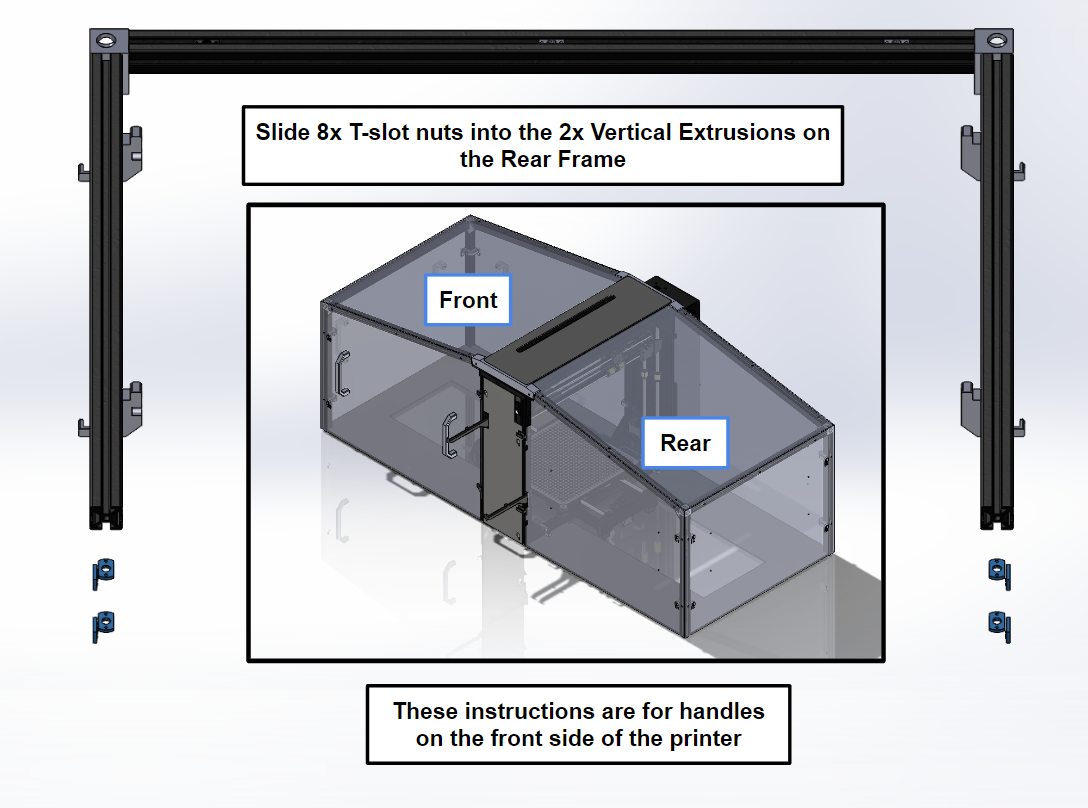
Then repeat for the Rear Frame. Before attaching the Bottom Panel follow [reference#2]!
[reference#2]: Before attaching the bottom panel to the rear frame, slide 8x M5 T-Slot Nuts into the bottom side of the 2x Vertical Extrusions. Slide 2x T-Slot nuts on each outward facing side of the Vertical Extrusions.

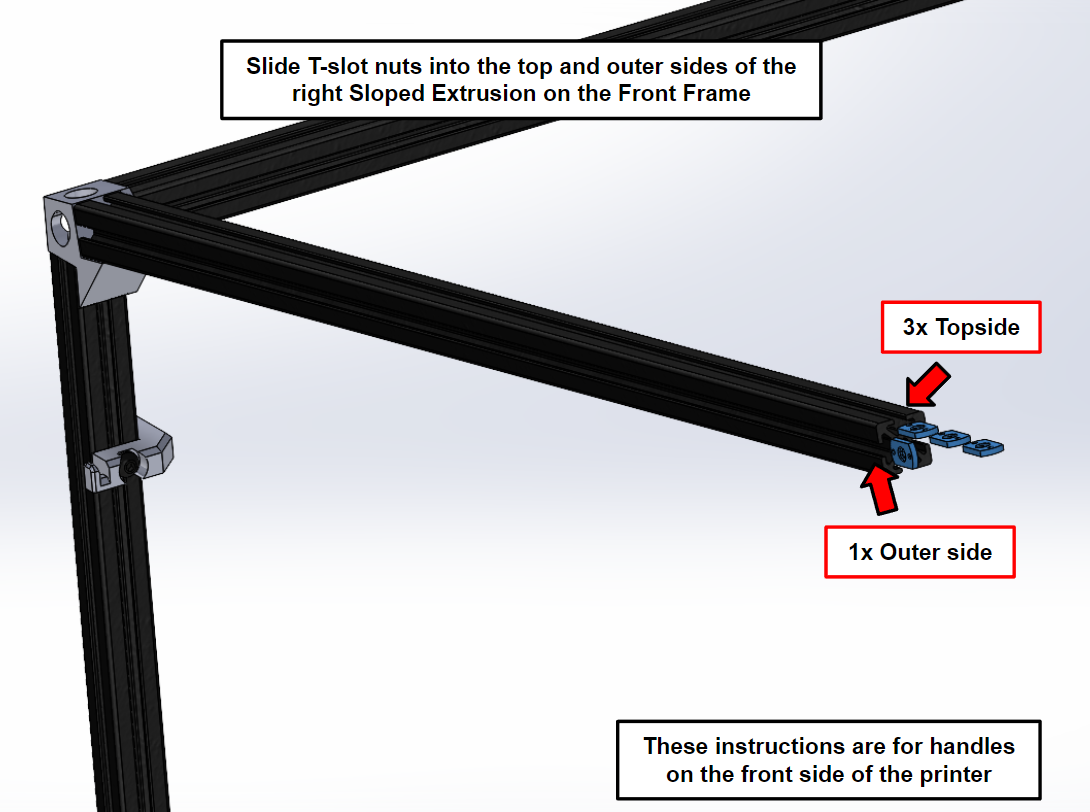
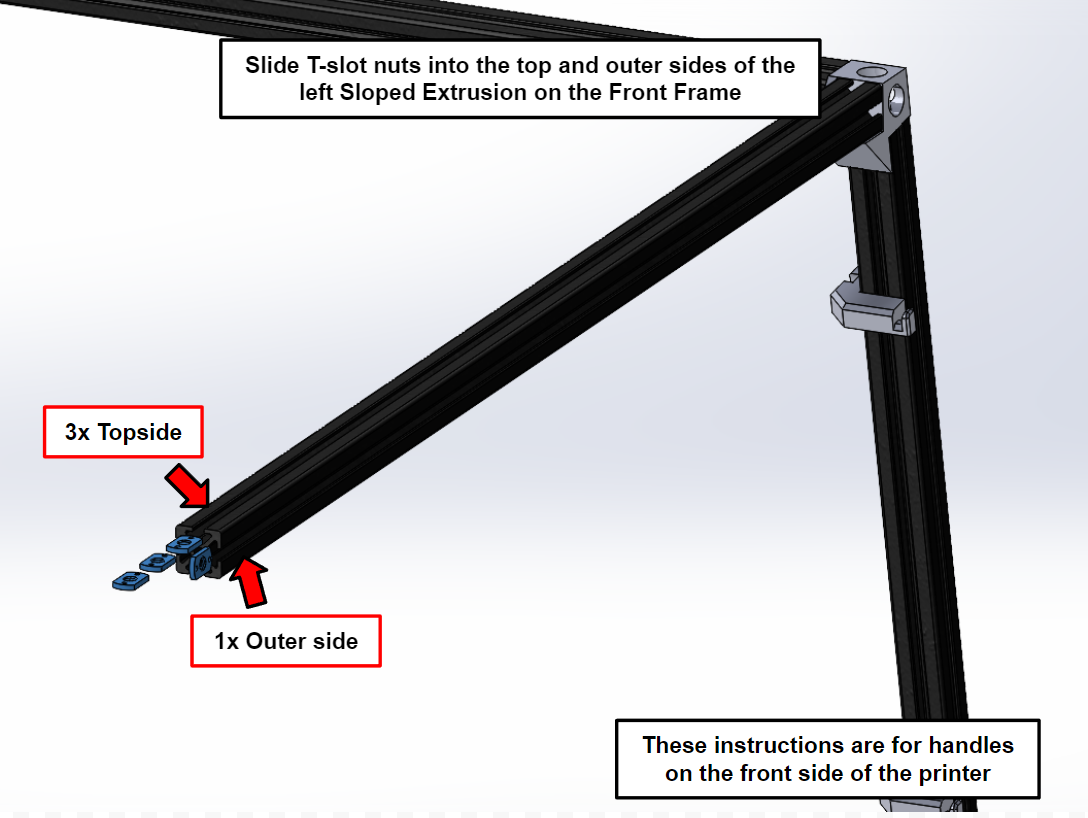
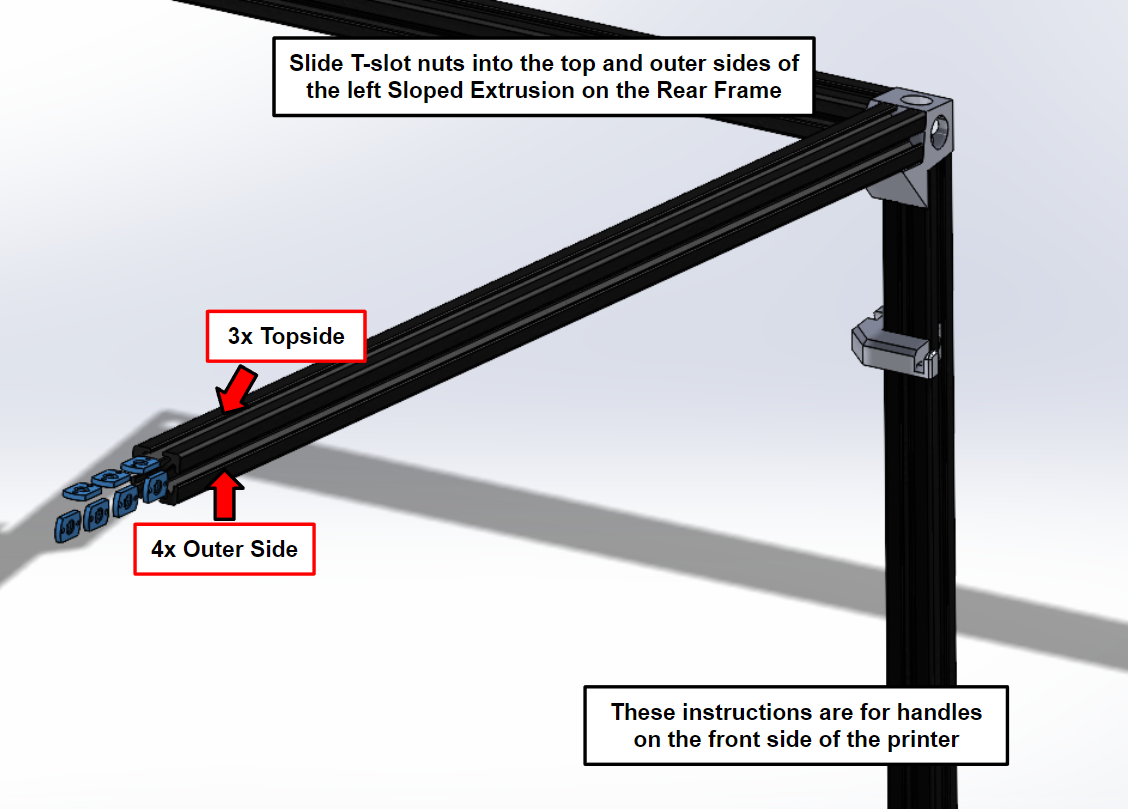
Before installing the front extrusion frame to the front side of the TAZ Pro, prepare the 2x Sloped Extrusions with M5 T-Slot Nuts.
These instructions will show where T-slot nuts are needed with the handles on the three front panels.
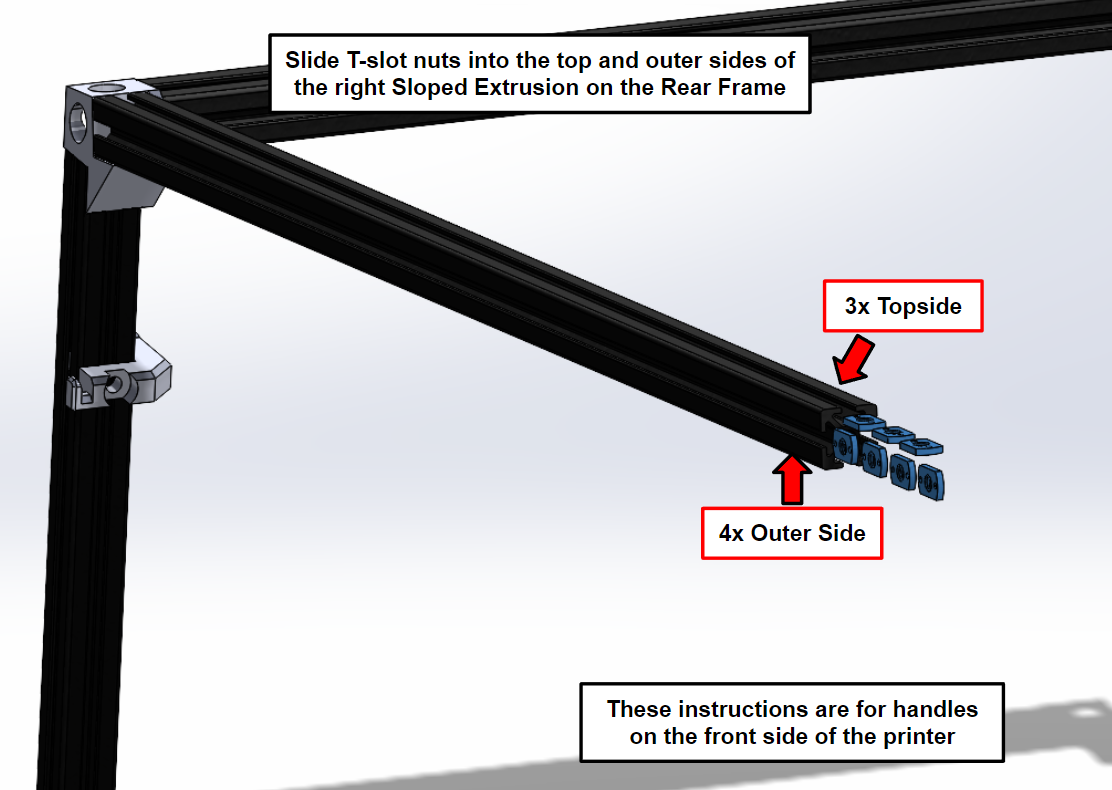
Slide 1x T-slot nut into the outer side of the right sloped extrusion, followed by 3x on the top side of the extrusion.
Then repeat for the left extrusion making sure the 1x T-slot nut is on the outer side.
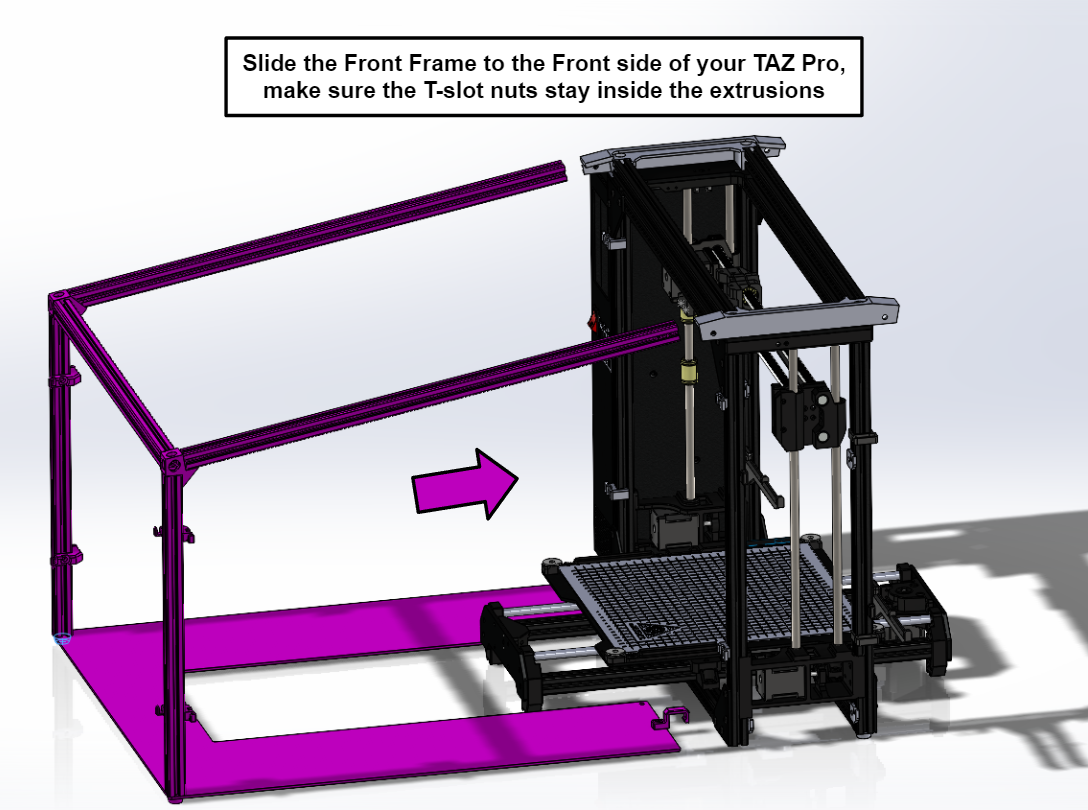
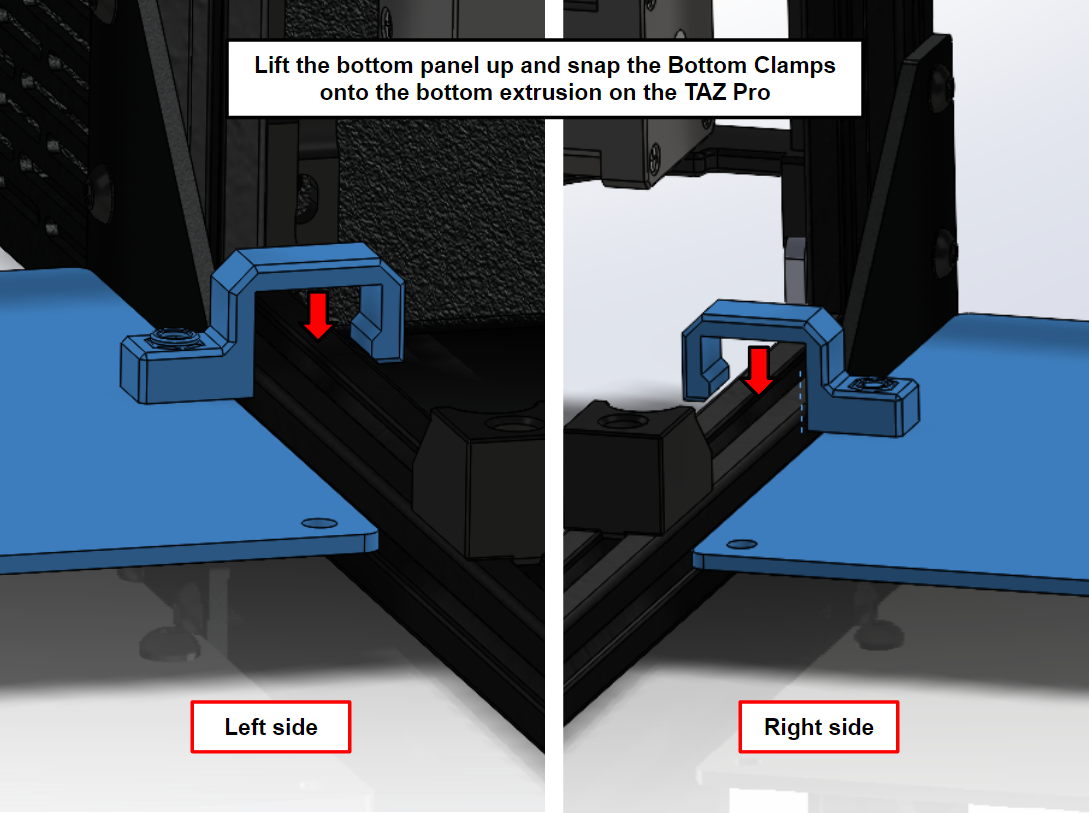
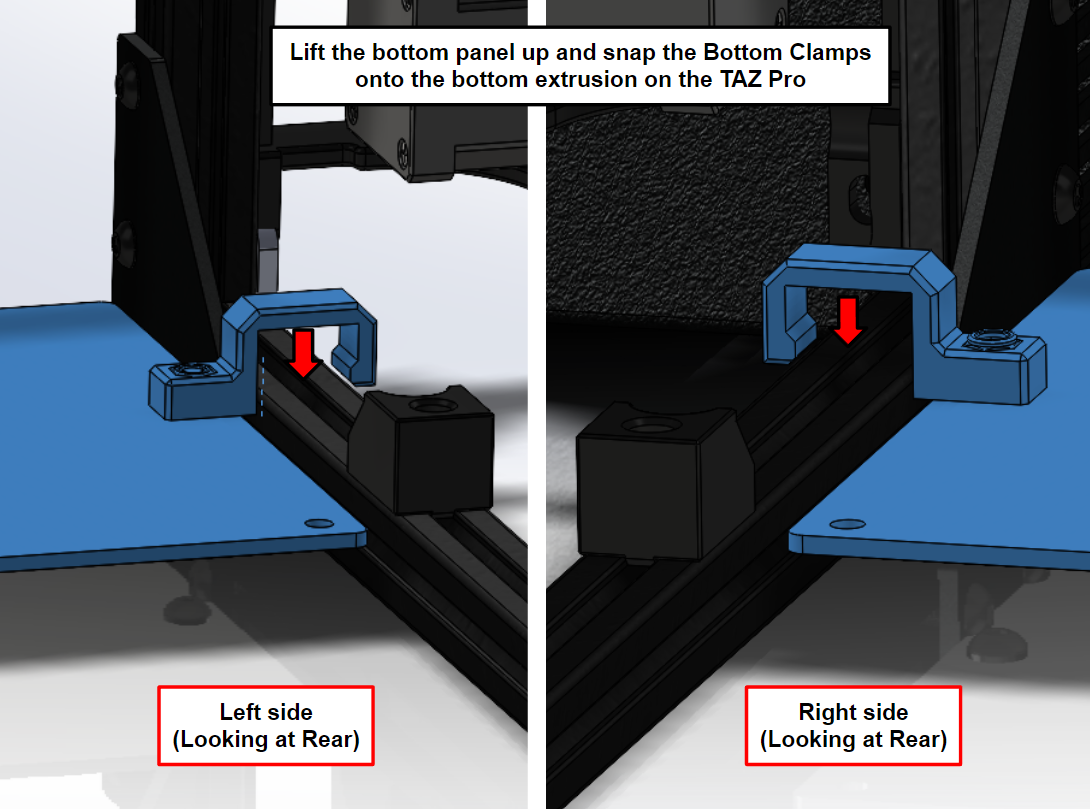
Once the T-slot nuts are slid inside of the sloped extrusions align the frame with the front side of the printer. Now lift the bottom panel up so that you can snap the 2x bottom clamps onto your TAZ Pro bottom extrusion.
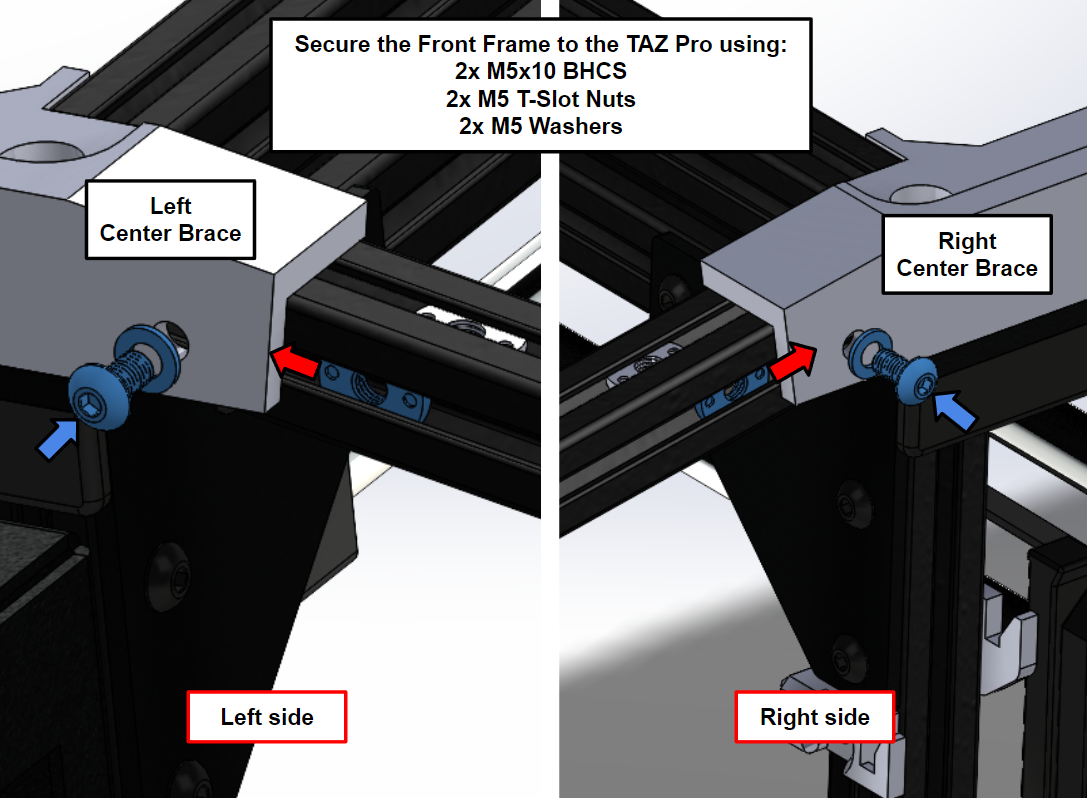
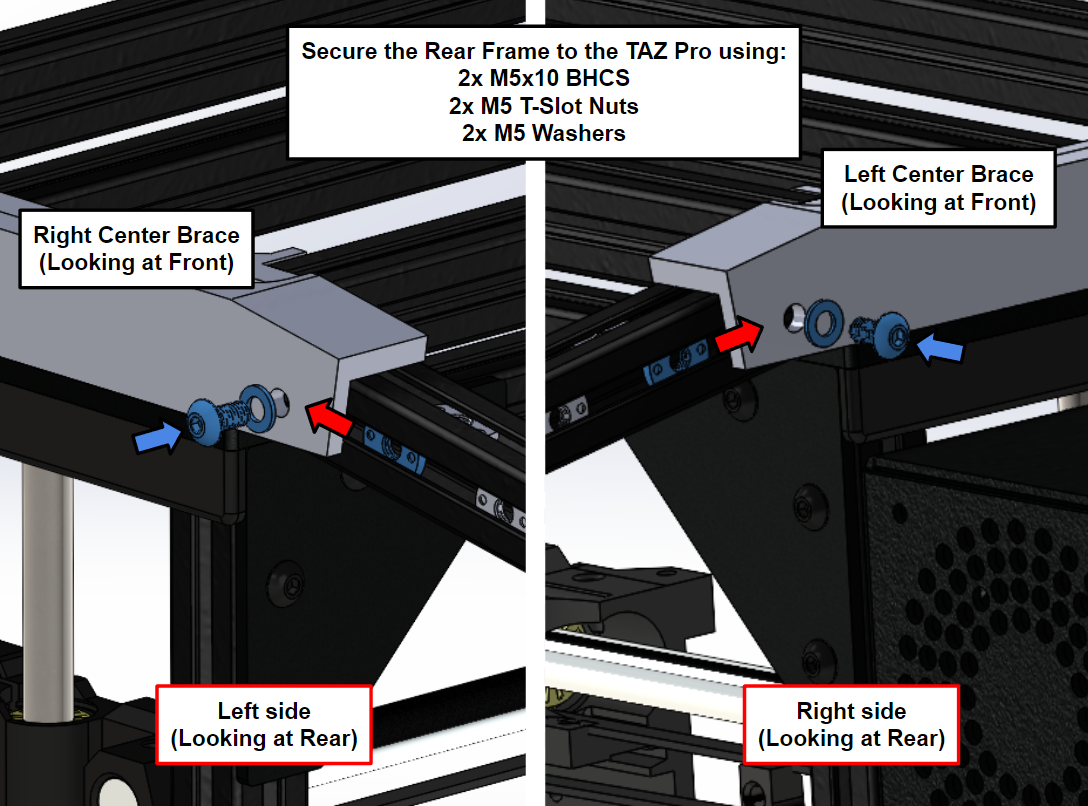
Now align the 2x sloped extrusions with both the left and right center braces. Use 1x M5x10 BHCS with a washer and slide the 1x T-slot nut up the extrusion and align it with the outer hole on the center brace.
Then fasten the M5x10 BHCS to secure the top side of the extrusion frame to the printer frame, repeat for the other center brace.
Now repeat the process for the rear frame but place 4x M5 T-slot nuts on the outer faces of the sloped extrusions and 3x on the top faces.
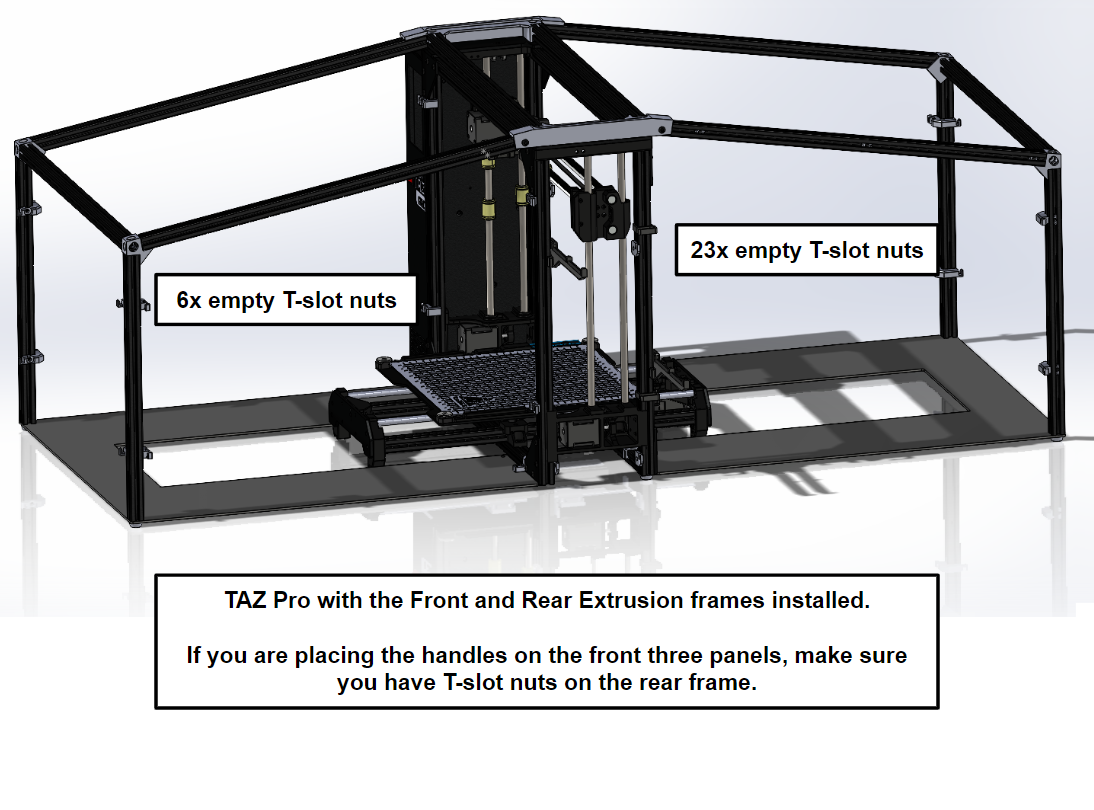
Once both extrusion frames are attached make sure you have 6x empty T-slot nuts on the top faces of the front sloped extrusions and 23x empty T-slot nuts on the rear frame which will be used to secure the back panels.
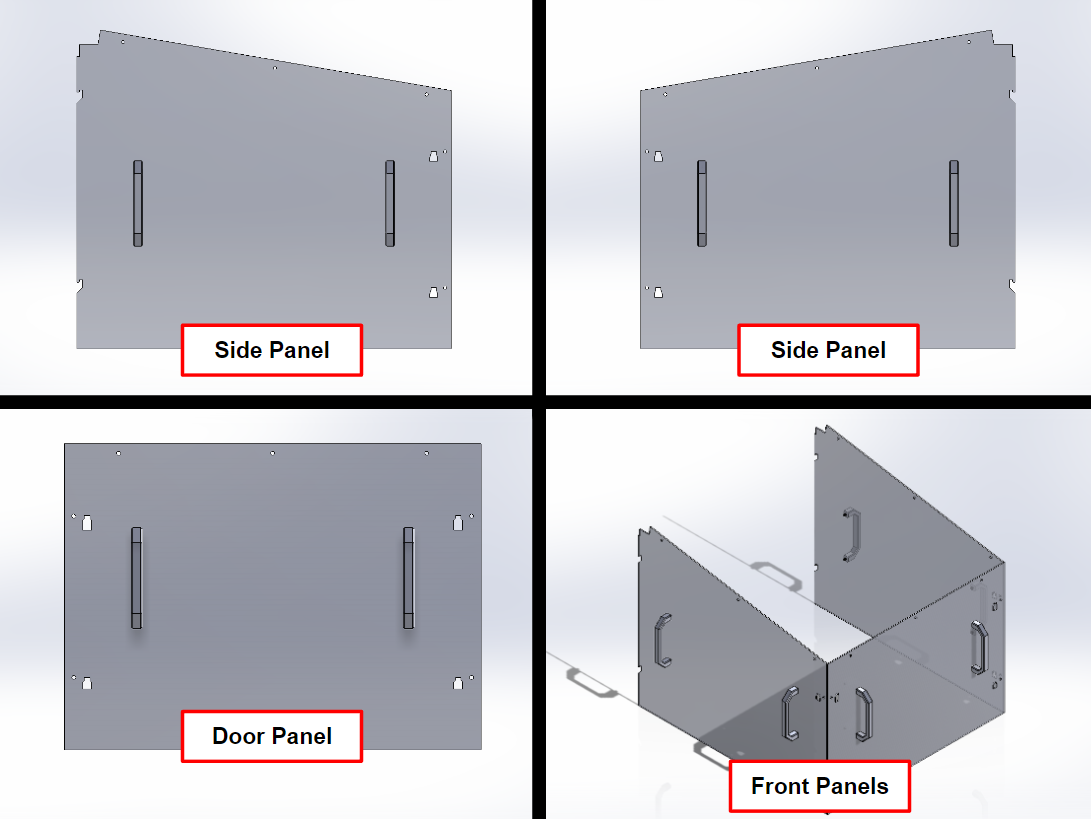
We provide 6x handles with the Long Bed Enclosure kit, which is enough for three out of the six side panels.
We recommend installing the handles on the front three panels, if you would like to place the handles on different panels you will need to move the T-slot nuts so they can secure any panels that isn't receiving handles.
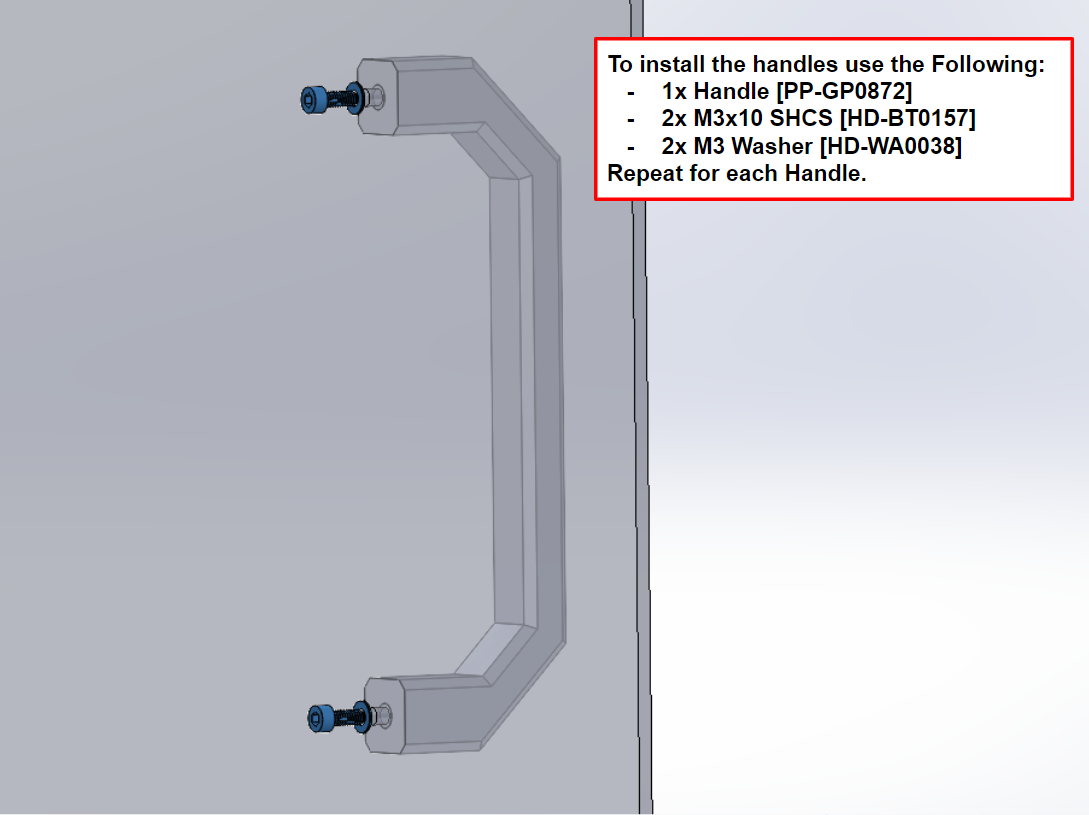
To install the handles use 1x handle [PP-GP0872], 2x M3x10 SHCS [HD-BT0157], and 2x M3 washers [HD-WA0038]. Make sure the handles are on the outer face of the panels!
sample