Open HardwareAssembly Instructions
Guides for installation and assembly of the LulzBot line of products made by FAME 3D LLC.
Guides for installation and assembly of the LulzBot line of products made by FAME 3D LLC.
Here is a list of parts that do not need cleaned after harvest:
PP-GP0060 Extruder Washer v3.0 (T6) (M) (A)
PP-GP0091 Extruder Latch v2.1 (T6) (A)
PP-GP0153 Extruder Fan Mount v1.0 (T5)
PP-GP0154 Electronics Case Mount v2.0 (T6)
PP-GP0195 Rocktopus (sales)
PP-GP0199 40mm Fan Duct for Dual v0.3 (A)
PP-GP0201 Exruder Mount v2.4 (A)
PP-GP0207 X Carriage Guide v2.0 (T6)
PP-GP0211 Fan Duct Left v0.7.4.1d (T6)
PP-GP0212 Fan Duct Right v0.7.4.1d (T6)
PP-GP0215 Z Lower Left v2.5 (T6)
PP-GP0220 Interconnect Housing v0.6 (T6)
PP-GP0222 Y Belt Mount v0.75 (T6)
PP-GP0223 Bed Mount Chassis v3.3 (T6)
PP-GP0225 Y Idler Mount v4.0 (T6)
PP-GP0226 Y Motor Mount v3.0 (T6)
PP-GP0230 LCD Bezel v1.1 (T6)
PP-GP0231 Wiper Mount v1.1 (T6) (M)
PP-GP0232 Heatsink Fan Duct v0.6 (T6) (M)
PP-GP0234 LCD Knob v0.2 Design Dent 2 (T6)
PP-GP0242 Opah Heatsink Fan duct v1.1 (A)
PP-GP0244 Opah Extruder Brace v0.3 (A)
PP-GP0249 Bed Clip v3 (M)
PP-GP0251 Extruder Mount v2.11 (M)
PP-GP0253 Spool Arm Bracket v1.0 (M)
PP-GP0259 Handle Bar v2.6 (M)
PP-GP0263 Y Motor Mount v1.4 (M)
PP-GP0265 Strain Relief Lower v1.2 (M)
PP-GP0266 Strain relief Upper v3.0 (M)
PP-GP0269 Lower Z Left v1.6 (M)
PP-GP0270 Lower Z Right v1.6 (M)
PP-GP0271 Z Upper Left v2.0 (M)
PP-GP0272 Z Upper Right v2.0 (M)
PP-GP0277 Belt Clamp Black v1.2 (M)
PP-GP0278 Belt Mount Black v1.2 (M)
Some parts will need cleaned with a Scotch Brite pad to remove the white residue left on the print surface. These are parts that the print surface is visible in their final assemblies so cosmetics are important. Gently rub a Scotch Brite pad WITH THE GRAIN of the print lines to remove this white residue (see images). Do not rub cross grain because this will cause very visible scratches in the printed part. Once you have cleaned the parts with a Scotch Brite pad, we will need to spray them with compressed air to remove dust, debris, and pad fibers from the printed part. There is a dust vacuum and an airbrush set up in the parts cleaning station. Hold the part in the "cone" of the vacuum while spraying the part with air from the airbrush so that all the debris/dust ends up in the vacuum (see images). Do your best to clean all debris/lint/fibers off of the printed parts.
Printed parts that need cleaned with Scotch Brite/Airbrush:
PP-GP0061 Herringbone Large Gear v1.3 (A)
PP-GP0074 Feed Tube Spinner (T5) (A)
PP-GP0109 Spool Arm (T5) (A)
PP-GP0191 Herringbone Large Gear v1.3 (T6) (M) (A)
PP-GP0193 Extruder Idler Block v1.4c (T6) (A)
PP-GP0194 Extruder Mount Hex v1.0 Black (A)
PP-GP0197 Dual Extruder 2.0 Mount v1.0 (A)
PP-GP0198 Javelin Flex plate v1.2 (A)
PP-GP0202 Extruder Mount Hex v1.0 (A)
PP-GP0203 T-Nut Holding Jig (A)
PP-GP0206 X Carriage v0.3 (T6)
PP-GP0208 Extruder Mount v0.8 (T6)
PP-GP0216 Z-Min Switch Mount v4.1 (T6)
PP-GP0217 Spool Arm v0.2 (T6)
PP-GP0218 Tippy Feed Tube Holder v0.6 (T6)
PP-GP0219 Feed Tube Spinner v3.0 (T6)
PP-GP0227 Z Lower Right v2.5 (T6)
PP-GP0228 Y Corner Left v2.4 (T6)
PP-GP0229 Y Corner Right v2.4 (T6)
PP-GP0236 Z Upper v2.6 (T6)
PP-GP0246 Opah Extruder Mount v1.2 (A)
PP-GP0254 Spool Arm Support v1.3 (M)
PP-GP0255 Spool Arm v1.4 (M)
PP-GP0264 Y Idler v1.6 (M)
PP-GP0280 X Carriage Cap v2.5 (M)


Some parts are printed with support material. This support will need removed from the part before it can be used for production. We currently only have 2 styles of support in our production parts. The first kind will be a lattice type structure that supports multiple parts in one print (found on LCD Spacers and SD Bezels). The second type is built into the part to assist with printing overhangs (found on extruder bodies) (see images).
The following parts will need support material removed:
PP-GP0089 LCD Spacer v0.4 (T6)
PP-GP0186 Extruder Body Hex v1.4.1 (T6) (M) (A)
PP-GP0200 Flexystruder Body Hex v2.0 (A)
PP-GP0235 SD Card Bezel v0.8 (T6)
PP-GP0279 Opah Extruder Body v0.2 (A)


Some parts need drilled or punched out on the drill press. These parts are:
PP-GP0062 Herringbone Small Gear v1.1 (A)
PP-GP0192 Herringbone Small Gear v1.1 (T6) (M) (A)
PP-GP0224 Bed Mount Table v3.1 (T6)
PP-GP0252 Extruder Fan Mount v2.0 (M)
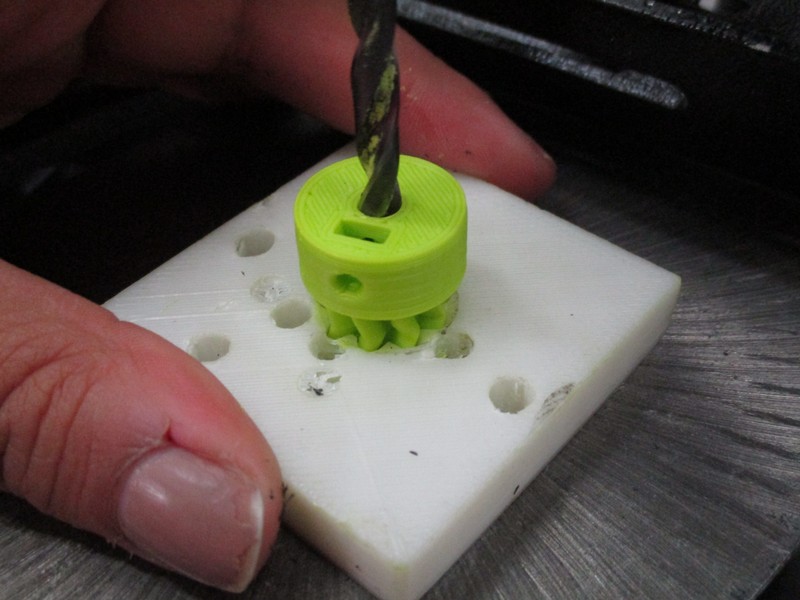
The Small Herringbone Gears (PP-GP0062, PP-GP0192) need drilled out to ensure a tight fit on the motor shafts. There is a drill out jig that holds a small herringbone gear on the drill press to be drilled out. Using a ___ drill bit place the herringbone gear into the jig and use the drill press to drill out the center of the gear (see images).
The Bed Mount Tables (PP-GP0224) will need the holes punched out. Using the specially made punch and table mount jig for the drill press we punch these holes out. The jig holds the table mount parallel to the drill press table. Without turning on the drill press, place a bed mount table in the jig and align the punch to the center of one punch out holes. Now pull on the drill press handle to drive the punch through the printed part. Repeat on the other punch out hole.
The Extruder Fan Mount (PP-GP0252) will need the two mounting holes countersunk. To do this attach the countersink bit to the drill press. Turn on the drill press and while holding the fan mount line up the mounting holes to the bit, carefully push up to add a countersink to the mounting holes (see images). ONLY DO THIS TO THE TOP TWO HOLES.


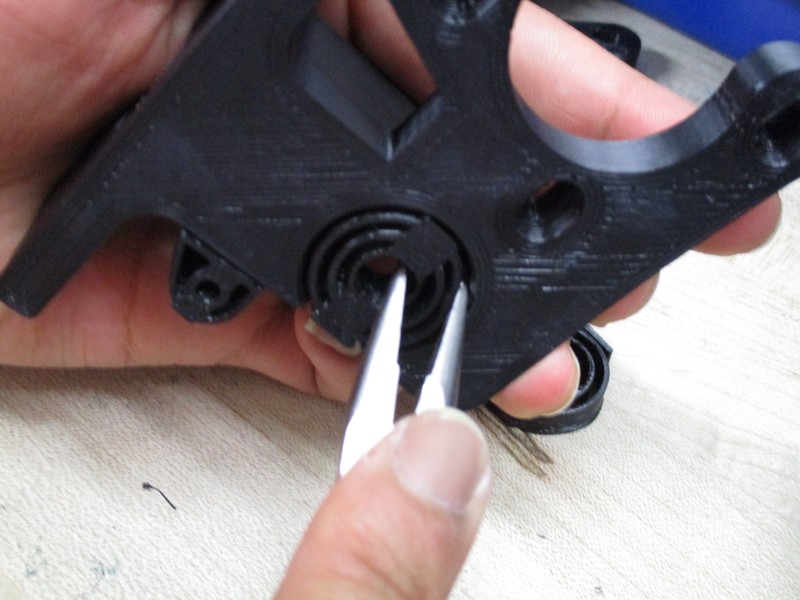
Some parts will have little bits of plastic stuck to the outside surface of the print. This is due to retractions and toolhead moves in the printing process. In order to clean these "blobs" of plastic off, get some flush cutters and cut the strings/blobs off of the part. Ensure to get as close to the part as possible without damaging the print. Parts that will need these retraction strings cut off are:
PP-GP0245 Beefy Idler Latch v2.2 (M) (A)
PP-GP0247 USB Support v1.0 (M)
PP-GP0275 Opah Idler Latch v2.2 (A)
PP-GP0276 Beefy Extruder Idler v0.4 (M) (A)


Almost all parts printed in Ninjaflex will have little stringers stuck to the outside surface of the print. This is due to retractions and toolhead moves in the printing process combined with the oozing effect of the TPU filaments. In order to clean these stringers off, get some flush cutters and cut the strings/blobs off of the part. Ensure to get as close to the part as possible without damaging the print. Parts that will need these stringers cut off are:
PP-GP0221 Bed Corner Taz6 v2.0 (T6)
PP-GP0237 Flexy Washer v0.1 (T6)
PP-GP0238 Flexy bed Foot v0.1 (T6)
PP-GP0248 Bed Corner Mini v2.7 (M)


